Installing A Ceiling Fan With Light
A ceiling fan with light is a great way to improve the comfort and style of your home. It can provide much-needed air circulation, especially during the hot summer months. And with a built-in light, it can also provide additional illumination to your room. Installing a ceiling fan with light is a relatively simple project that can be completed in a few hours. Here are the steps on how to do it:
1. Safety First
Before you begin, make sure to turn off the power to the room at the circuit breaker panel. Also, be sure to wear safety glasses and gloves.
2. Gather Your Tools and Materials
You will need the following tools and materials to install a ceiling fan with light:
- Ceiling fan with light
- Screwdriver
- Drill
- Wire strippers
- Electrical tape
- Ceiling fan mounting bracket
- Ceiling fan canopy
- Light bulbs
3. Install the Mounting Bracket
The first step is to install the ceiling fan mounting bracket. This bracket will support the weight of the fan and must be securely attached to the ceiling joists. To install the mounting bracket, follow these steps:
- Locate the ceiling joists in the area where you want to install the fan. You can do this by using a stud finder.
- Mark the location of the mounting bracket on the ceiling.
- Drill pilot holes into the ceiling joists at the marked locations.
- Screw the mounting bracket into the ceiling joists.
4. Install the Fan Canopy
The next step is to install the fan canopy. The fan canopy will hide the mounting bracket and wires. To install the fan canopy, follow these steps:
- Attach the fan canopy to the mounting bracket.
- Secure the fan canopy with the screws provided.
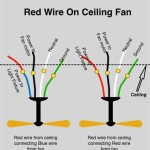
5. Wire the Fan
Now it's time to wire the fan. To do this, follow these steps:
- Strip the insulation off the ends of the wires coming from the fan.
- Connect the black wire from the fan to the black wire from the ceiling.
- Connect the white wire from the fan to the white wire from the ceiling.
- Connect the green wire from the fan to the ground wire from the ceiling.
- Secure all connections with electrical tape.
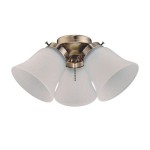
6. Install the Light Bulbs
Once the fan is wired, you can install the light bulbs. To do this, simply screw the light bulbs into the sockets on the fan.
7. Install the Fan Blades
The final step is to install the fan blades. To do this, follow these steps:
- Attach the fan blades to the fan motor.
- Secure the fan blades with the screws provided.
8. Turn on the Power
Once the fan is installed, you can turn on the power at the circuit breaker panel. The fan should now be operational.
Installing a ceiling fan with light is a relatively simple project that can be completed in a few hours. By following these steps, you can enjoy the benefits of a ceiling fan with light in your home.

Wiring A Ceiling Fan And Light With Diagrams Ptr

Wiring A Ceiling Fan And Light With Diagrams Ptr

Wiring A Ceiling Fan And Light With Diagrams Ptr

Replacing A Ceiling Fan Light With Regular Fixture Jlc Online

Wiring A Ceiling Fan And Light With Diagrams Ptr

Wiring A Ceiling Fan And Light With Diagrams Ptr

Replacing A Ceiling Fan Light With Regular Fixture Jlc Online

How To Wire A Ceiling Fan Control Using Dimmer Switch

How To Replace A Ceiling Fan With Light Step By Youtube

How To Replace A Ceiling Fan Light Kit Smafan Com