How To Install A New Ceiling Fan
Installing a ceiling fan can be a great way to improve the airflow in your home and make it more comfortable. It can also be a relatively easy project to do yourself, even if you're not a professional electrician. Here are the steps on how to install a new ceiling fan:
1. Gather your materials. You will need the following materials to install a ceiling fan:
- A new ceiling fan
- A screwdriver
- A wire cutter/stripper
- Electrical tape
- A ladder
2. Turn off the power to the room where you will be installing the fan. This can be done by flipping the breaker or removing the fuse. Once the power is off, you can remove the old ceiling fan (if there is one) by following the manufacturer's instructions.
3. Install the mounting bracket. The mounting bracket is the part of the fan that attaches it to the ceiling. It should come with the fan and will likely be made of metal. To install the mounting bracket, you will need to use screws to attach it to the electrical box in the ceiling. Make sure that the mounting bracket is securely attached before proceeding.
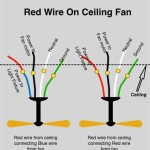
4. Connect the wires. Once the mounting bracket is installed, you can connect the wires from the fan to the wires in the electrical box. The wires should be color-coded, so it should be easy to match them up. Use wire nuts to connect the wires and then wrap them with electrical tape to secure them.
5. Install the fan blades. The fan blades are the part of the fan that creates the airflow. They should come with the fan and will likely be made of plastic or metal. To install the fan blades, you will need to use screws to attach them to the fan motor. Make sure that the fan blades are securely attached before proceeding.
6. Install the light fixture. The light fixture is the part of the fan that provides light. It should come with the fan and will likely be made of glass or plastic. To install the light fixture, you will need to use screws to attach it to the fan motor. Make sure that the light fixture is securely attached before proceeding.
7. Turn on the power and test the fan. Once the fan is installed, you can turn on the power and test it. The fan should start spinning and the light should come on. If the fan is not working properly, check the connections and make sure that the wires are properly connected.
Congratulations! You have now successfully installed a new ceiling fan.

Installing A Ceiling Fan Fine Homebuilding

How To Install A Ceiling Fan Diy Guide So Simple Anyone Can Do It

Wiring A Ceiling Fan And Light With Diagrams Ptr

How To Replace A Ceiling Fan Zillow

Installing A Ceiling Fan In Home Or Office Pro Tool Reviews

Hunterexpress Easy Installation Ceiling Fan Hunter

How To Safely Install A Ceiling Fan In Your Home White Electric Electricians North

How To Install A Ceiling Fan True Value

How To Install A Ceiling Fan 5 Places Not One Belco Inc

How To Replace A Capacitor In Ceiling Fan 3 Ways