Painting A Ceiling With A Roller
Painting a ceiling with a roller can be a daunting task, but it is definitely possible to achieve a professional-looking finish with a little patience and preparation. Here are the steps on how to paint a ceiling with a roller:
1. Prepare the Ceiling
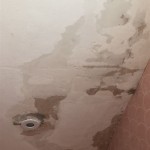
Before you start painting, it is important to prepare the ceiling by cleaning it and removing any dust or debris. You can do this by wiping it down with a damp cloth or using a vacuum cleaner with a soft brush attachment. If there are any cracks or holes in the ceiling, you should fill them in with spackling paste and allow it to dry completely.
2. Choose the Right Paint and Roller
When choosing paint for your ceiling, it is important to select a type that is specifically designed for ceilings. Ceiling paint is typically thicker and has a higher concentration of solids, which will help to prevent drips and splatters. You will also need to choose a roller that is the right size for the job. A roller that is too small will not be able to cover a large area quickly, while a roller that is too large will be difficult to control.
3. Set Up Your Workspace
Before you start painting, it is important to set up your workspace. This includes clearing away any furniture or other obstacles from the room and laying down drop cloths or plastic sheeting to protect the floor and walls from paint splatters. You should also open all of the windows and doors to ventilate the room and prevent fumes from building up.
4. Apply the Paint
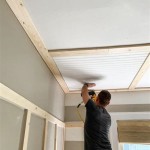
Once you have prepared your ceiling and set up your workspace, you can start applying the paint. Start by cutting in around the edges of the ceiling with a brush. This will help to prevent any paint from getting on the walls. Once you have cut in around the edges, you can start rolling the paint onto the ceiling. Use long, even strokes and overlap each stroke by about 50%. Be sure to roll the paint in the same direction as the light source to avoid any visible brush strokes.
5. Apply a Second Coat
Once the first coat of paint has dried completely, you can apply a second coat. This will help to ensure that the paint is evenly applied and that there are no missed spots. When applying the second coat, be sure to roll the paint in the opposite direction of the first coat. This will help to prevent any roller marks from showing through.
6. Clean Up
Once you have finished painting the ceiling, it is important to clean up your workspace. This includes cleaning your brushes and rollers and removing any drop cloths or plastic sheeting. You should also open all of the windows and doors to ventilate the room and allow the paint to dry completely.

How To Paint A Ceiling With Roller Harris

How To Paint A Ceiling

How To Paint A Ceiling

How To Paint A Ceiling Trusted House Painter

How To Best Paint Ceilings Valspar

How To Paint A Ceiling

How To Paint A Ceiling

How To Paint A Ceiling The Home

How To Paint A Ceiling With Roller Making Maanita

How To Paint A Ceiling Trusted House Painter