Replace Can Light With Ceiling Fan
Ceiling fans are a great way to improve airflow in your home, making it more comfortable during the summer months. They can also help to reduce your energy bills by circulating the air and keeping the temperature more consistent. If you're looking to add a ceiling fan to your home, one of the easiest ways to do it is to replace an existing can light.
Can lights are recessed lights that are typically installed in ceilings. They are a popular choice for lighting because they provide a clean, modern look. However, they can also be a bit limiting, especially if you want to add a ceiling fan. This is because can lights are typically not designed to support the weight of a ceiling fan.
If you're planning to replace a can light with a ceiling fan, there are a few things you'll need to do.
- Turn off the power to the can light. This is important for safety reasons. You don't want to risk getting electrocuted while you're working on the light.
- Remove the can light trim. The trim is the decorative ring that surrounds the light. It is usually held in place by a few screws.
- Disconnect the can light from the electrical wires. There will be two wires connected to the light: a black wire and a white wire. Disconnect the wires by unscrewing the wire nuts.
- Remove the can light from the ceiling. The can light will be held in place by a few screws. Remove the screws and carefully pull the light out of the ceiling.
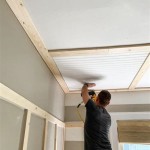
- Install the ceiling fan mounting bracket. The mounting bracket will come with the ceiling fan. It will need to be installed in the same location as the can light.
- Connect the ceiling fan wires to the electrical wires. The ceiling fan will have two wires: a black wire and a white wire. Connect the black wire to the black wire from the electrical box and the white wire to the white wire from the electrical box.
- Hang the ceiling fan from the mounting bracket. The ceiling fan will have a hook or bracket that will allow it to be hung from the mounting bracket.
- Install the ceiling fan blades. The ceiling fan blades will come with the fan. They will need to be attached to the fan motor.
- Turn on the power to the ceiling fan. Once the fan is installed, you can turn on the power and test it out.
Replacing a can light with a ceiling fan is a relatively easy project that can be completed in a few hours. By following these steps, you can add a ceiling fan to your home and improve the airflow and comfort in your space.
Here are some additional tips for replacing a can light with a ceiling fan:
- Make sure that the ceiling fan you choose is the right size for your room. A fan that is too small will not be able to circulate enough air, while a fan that is too large will be too noisy and could be dangerous.
- Consider the style of the ceiling fan you choose. There are many different styles of ceiling fans available, so you can find one that will match the décor of your home.
- Be sure to read the instructions that come with the ceiling fan before you start installing it. This will help you to avoid any mistakes.

4 Ways To Replace A Light Bulb In Ceiling Fan Wikihow

How To Replace A Ceiling Fan With Light Step By Youtube

How To Replace A Light Fixture With Ceiling Fan Projects By Peter

Replacing A Ceiling Fan Light With Regular Fixture Jlc Online

How To Add A Light Kit Your Ceiling Fan Mr Electric

4 Ways To Replace A Light Bulb In Ceiling Fan Wikihow

How To Replace A Ceiling Fan With Pendant Light

4 Ways To Replace A Light Bulb In Ceiling Fan Wikihow

How To Layout Recessed Lights With A Ceiling Fan Lamphq

5 Tips For Replacing A Light Fixture With Ceiling Fan Dig This Design