How to Do a Drop-Down Ceiling
A drop-down ceiling, also known as a suspended ceiling or a T-bar ceiling, is a popular option for both residential and commercial spaces. It offers numerous advantages, such as concealing unsightly wiring and plumbing, providing easy access to utilities, and enhancing the aesthetic appeal of the room. This article provides a comprehensive guide to installing a drop-down ceiling, encompassing the necessary materials, steps involved, and essential tips to ensure a successful installation.
1. Planning and Preparation
Before embarking on the installation process, it is crucial to plan and prepare adequately. The first step is to determine the desired height of the drop-down ceiling. This should be considered based on the existing ceiling height, the intended use of the space, and the desired aesthetic. A lower ceiling can create a cozier atmosphere, while a higher ceiling can make the room feel more spacious.
Next, measure the area where the drop-down ceiling will be installed. This will help in determining the quantity of materials needed, such as ceiling tiles, T-bars, and suspension wires. It's also important to ensure that the existing ceiling supports the weight of the drop-down ceiling. If necessary, consult a structural engineer to assess the load-bearing capacity of the ceiling.
Finally, gather all the necessary tools and materials. These may include: * Ceiling tiles (mineral fiber, acoustic, or metal) * T-bars (aluminum or steel) * Suspension wires (stainless steel or galvanized) * Ceiling clips * J-channel * Level * Measuring tape * Utility knife * Drill with appropriate bits * Screwdriver * Safety glasses and gloves * Ladder or scaffolding
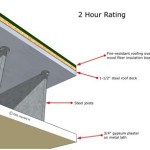
2. Installing the Suspension Grid
Once the preparation is complete, the installation of the suspension grid can begin. This grid forms the framework for holding the ceiling tiles.
1.
Mark and Install the Main Runners.
These are the longest T-bars that run perpendicular to the walls. Use a level to mark the position of the main runners on the existing ceiling, ensuring they are parallel and spaced at 12-inch intervals. Secure the main runners to the ceiling using ceiling clips, which are attached with screws.2.
Install the Cross Tees.
These are the shorter T-bars that run perpendicular to the main runners. They are usually spaced at 24-inch intervals, forming a grid pattern. Align the cross tees with the main runners and attach them to the clips using screws.3.
Install the Suspension Wires.
These wires hang from the existing ceiling and support the T-bar grid. Cut the wires to the desired length, ensuring they are slightly longer than the distance between the existing ceiling and the desired drop-down ceiling height. Attach the wires to the T-bars using specialized clips or hooks.4.
Install the Perimeter J-Channels.
These are used to create a clean finish around the perimeter of the drop-down ceiling. Attach the J-channels to the existing walls with fasteners, ensuring they are flush with the T-bar grid.3. Installing the Ceiling Tiles
With the suspension grid installed, it's time to install the ceiling tiles. These tiles are designed to fit snugly into the grid, creating a seamless ceiling surface.
1.
Start from a Corner.
Begin by placing a ceiling tile in one corner of the grid, aligning it with the T-bars. Gently press the tile into place until it snaps into position.2.
Continue Installing Tiles.
Continue placing tiles in the grid, working your way across and then down. Ensure each tile is firmly seated in the grid and that the edges are aligned with the T-bars.3.
Cut Tiles as Needed.
For the perimeter of the ceiling, you may need to cut tiles to fit around obstacles or irregular shapes. Use a utility knife or a tile cutter to make accurate cuts.4.
Finish the Edges.
Once all the ceiling tiles are installed, insert the edges of the tiles into the J-channels around the perimeter. This will create a neat and finished look.4. Additional Tips
Here are some additional tips to ensure a successful drop-down ceiling installation:
*
Use a Level:
To ensure a straight and level ceiling, use a level to verify the position of the T-bars and ceiling tiles throughout the installation process.*
Wear Safety Gear:
Always wear safety glasses and gloves when working with tools and materials.*
Consider Insulation:
For noise reduction or thermal efficiency, consider adding insulation between the existing ceiling and the drop-down ceiling.*
Proper Lighting:
Install appropriate lighting fixtures before the installation to provide adequate illumination for the room.*
Professional Help:
For large or complex installations, it's best to consult a professional contractor to ensure a high-quality finish.
A Drop Ceiling That Looks Better Than Drywall How To Install In Basement Diy Youtube

How To Make And Install Dropped Ceiling False Suspended Drop

Drop Ceiling Installation Ceilings Armstrong Residential

Drop Down Ceiling Ideas Ceilings Armstrong Residential

Build Basic Suspended Ceiling Drops Drop Ceilings Installation How To

Simple Diy Dropping Ceiling Design

Drop Down Ceiling Ideas Ceilings Armstrong Residential

Modern Drop Ceiling Ideas To Love Craving Some Creativity

Dropped Ceiling Feature Plastering Rendering Buildhub Org

A Drop Ceiling That Looks Better Than Drywall How To Install In Basement Diy Youtube