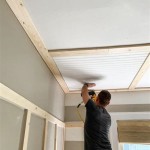
## Poplar Tongue and Groove Ceiling Poplar is a popular choice for tongue and groove ceilings due to its durability, affordability, and aesthetic appeal. Tongue and groove ceilings are a type of wood ceiling that consists of long, narrow boards that are connected together by interlocking tongues and grooves. Poplar tongue and groove ceilings are a relatively easy and inexpensive way to add a touch of rustic charm to any room. ### Benefits of Poplar Tongue and Groove Ceilings There are many benefits to choosing a poplar tongue and groove ceiling, including: * **Durability:** Poplar is a hardwood that is known for its strength and durability. Tongue and groove ceilings are also resistant to warping and buckling, making them a good choice for areas with high humidity or temperature fluctuations. * **Affordability:** Poplar is a relatively affordable hardwood, making it a good value for your money. Tongue and groove ceilings are also easy to install, which can save you on labor costs. * **Aesthetic appeal:** Poplar tongue and groove ceilings have a beautiful, natural look that can add warmth and character to any room. The rich grain pattern of poplar will add visual interest and depth to your ceiling. ### How to Install a Poplar Tongue and Groove Ceiling Installing a poplar tongue and groove ceiling is a relatively easy process, but it is important to follow the instructions carefully to ensure a professional-looking finish. 1. **Prepare the surface:** The first step is to prepare the surface of the ceiling. This involves removing any old ceiling material and repairing any damaged areas. 2. **Install the furring strips:** Furring strips are used to create a level surface for the tongue and groove boards. They should be installed perpendicular to the joists, spaced 16 inches apart on center. 3. **Install the tongue and groove boards:** Begin by installing the tongue and groove boards in one corner of the room. Work your way across the ceiling, interlocking the tongues and grooves of the boards. 4. **Nail the boards:** Once the boards are in place, nail them into the furring strips. Use a nail gun or a hammer and nails. 5. **Caulk the seams:** Once the ceiling is installed, caulk the seams between the boards to prevent any air or moisture from leaking through. 6. **Paint or stain the ceiling:** If desired, you can paint or stain the ceiling to match your décor. ### Tips for Installing a Poplar Tongue and Groove Ceiling Here are a few tips for installing a poplar tongue and groove ceiling: * **Use a level:** Make sure to use a level when installing the furring strips and the tongue and groove boards. This will ensure that the ceiling is level and even. * **Nail the boards securely:** The boards should be nailed securely into the furring strips to prevent them from sagging or buckling. * **Caulk the seams:** Caulking the seams between the boards will help to prevent air or moisture from leaking through. * **Paint or stain the ceiling:** If desired, you can paint or stain the ceiling to match your décor. This will give the ceiling a finished look and protect it from the elements. ### Conclusion Poplar tongue and groove ceilings are a beautiful and affordable way to add a touch of rustic charm to any room. They are easy to install and can be painted or stained to match your décor. With a little care and attention, you can create a poplar tongue and groove ceiling that will last for many years to come.

Tongue And Groove Boards For Your Walls Ceilings Kentucky Lumber

Embracing Natural Elegance Milled Poplar Tongue And Groove Planks Transform Our Barn Tiny Thistle Studio

Poplar Water S Edge Woods Custom Wood Shop

Pin Page

Extraordinary Wood Ceilings Portfolio Water S Edge Woods Custom Shop

Rustic Poplar Shiplap V Groove Tongue And Siding For Sale

Poplar Tongue Groove Ceiling Traditional Entrance Other By Baird Brothers Fine Hardwoods Houzz Ie

Wood Ceiling Planks Custom Tongue Groove

Poplar Roof Boards Carpentier

Pin Page
See Also