How To Clean A Ceiling Vent
Ceiling vents play a vital role in maintaining comfortable indoor temperatures by facilitating airflow. Over time, however, these vents can accumulate dust, dirt, pet dander, and other airborne particles. This build-up not only restricts airflow and reduces heating and cooling efficiency but can also negatively impact indoor air quality. Regular cleaning is essential to ensure optimal performance and a healthy living environment.
Before beginning the cleaning process, it's crucial to gather the necessary supplies. These commonly include a sturdy stepladder, a vacuum cleaner with a brush attachment, a duster, a microfiber cloth or sponge, mild detergent, warm water, and a container for the cleaning solution. Gloves and safety glasses are also recommended for personal protection.
Safety should always be the top priority. Before attempting to access any ceiling vent, turn off the associated HVAC system. This prevents any accidental activation during cleaning and minimizes the risk of injury. Positioning the stepladder on a stable, level surface is crucial for safety and stability while working.
The first step involves removing loose debris from the vent cover. A vacuum cleaner with a brush attachment is ideal for this task. Gently run the brush over the vent surface, paying attention to the crevices and corners where dust often accumulates. A duster can also be used to remove cobwebs and larger particles before vacuuming.
Once the loose debris has been removed, the vent cover usually needs to be detached for a more thorough cleaning. Most vent covers are held in place by clips or screws. Carefully examine the vent cover to determine the method of attachment. If clips are present, gently apply pressure to release them. If screws are used, a screwdriver will be required for removal. Take care not to damage the vent cover during this process. If unsure about the removal process, consulting the manufacturer's instructions or a professional is recommended.
After removing the vent cover, it can be cleaned more thoroughly. Prepare a cleaning solution by mixing warm water and a mild detergent in a container. Submerge the vent cover in the solution and allow it to soak for approximately 30 minutes. This helps to loosen stubborn dirt and grime. After soaking, use a microfiber cloth or sponge to gently scrub the vent cover, removing any remaining residue. Rinse the vent cover thoroughly with clean water and ensure it is completely dry before reattaching.
While the vent cover is soaking, attention can be turned to cleaning the vent opening itself. Using the vacuum cleaner's brush attachment, carefully remove dust and debris from the ductwork and surrounding ceiling area. A duster can also be used to reach tight spaces. Exercise caution not to push debris further into the ductwork. For hard-to-reach areas, a flexible duster or a vacuum cleaner with an extension hose can be beneficial.
Once the vent cover is completely dry, it can be reattached to the ceiling vent. Align the cover with the vent opening and secure it using the clips or screws. Ensure the cover is firmly in place to prevent rattling or airflow issues.
The frequency of ceiling vent cleaning depends on several factors, including the number of occupants in the home, the presence of pets, and the local environment. As a general guideline, cleaning vents every three to six months is recommended. In homes with pets or individuals with allergies, more frequent cleaning may be necessary.
Regularly cleaning ceiling vents offers several benefits, including improved indoor air quality, increased HVAC system efficiency, and extended lifespan of the system. By following these cleaning steps, homeowners can contribute to a healthier and more comfortable living environment while also maximizing the performance of their heating and cooling systems.
For individuals with allergies or sensitivities to dust and other airborne particles, wearing a mask during the cleaning process is advisable. This helps to minimize exposure to allergens and prevent respiratory irritation. Disposable gloves can also be helpful in preventing skin irritation from cleaning solutions.
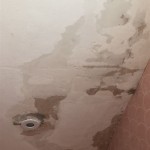
While cleaning ceiling vents is a task most homeowners can handle, certain situations may require professional assistance. If mold or mildew is present in the vents, contacting a professional mold remediation specialist is essential. Similarly, if there are signs of pest infestation in the ductwork, contacting a pest control professional is recommended.
Maintaining clean ceiling vents is a simple yet effective way to improve indoor air quality and optimize HVAC system performance. By incorporating regular vent cleaning into a home maintenance routine, individuals can create a healthier and more comfortable living space.

How To Clean Your Air Vents

How To Clean Your Vents Spring Cleaning Action Air Heating Conditioning Fishers Na

Remove And Clean Round Air Vents

How To Clean The Ceiling Around Ac Vents Tri County A C And Heating

How To Clean Ceiling Vent Covers And Tips Prevent Mold Growth

How To Clean Ceiling Vents When There S Mold Tri County A C And Heating

How To Clean A Bathroom Fan Diy Family Handyman

How To Clean Heating And Cooling Vent Covers A Janitor S Story Com

How To Clean Your Air Vents

How Do You Clean Heating Ducts In The Ceiling Duct Masters