How To Remove A Painted Popcorn Ceiling
Popcorn ceilings, also known as acoustic or textured ceilings, were a popular architectural feature in the mid-20th century. While they offered some sound dampening and concealed imperfections, they have fallen out of favor due to their tendency to collect dust, difficulty to clean, and dated appearance. Removing a painted popcorn ceiling can dramatically update a room, but it requires careful planning and execution.
Assessing the Ceiling
Before starting the removal process, it is crucial to determine if the popcorn ceiling contains asbestos. Asbestos, a known carcinogen, was commonly used in building materials before the 1980s. If asbestos is present, professional abatement is necessary. Testing kits are available for purchase, or a professional asbestos inspector can be hired. Additionally, the ceiling's existing condition should be evaluated for any damage or repairs needed before removal commences.
Gathering Necessary Supplies and Equipment
Proper equipment and supplies ensure efficient and safe removal. Essential items include: plastic drop cloths, painter's tape, a spray bottle filled with water, a scraper with a wide blade (preferably a 6-12 inch drywall knife), safety glasses or goggles, a dust mask or respirator (especially if asbestos is not confirmed absent), work gloves, a ladder or scaffolding for reaching the ceiling comfortably, and garbage bags for disposal. A garden pump sprayer can be beneficial for larger areas.
Preparing the Room
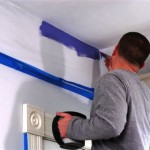
Protecting the room's contents and surfaces from debris and water damage is crucial. Furniture should be removed or covered completely with drop cloths. Floors should be protected with thick plastic sheeting taped securely to the baseboards. Walls should be covered as well, especially near the ceiling line. Light fixtures and ceiling fans should be removed, and electrical outlets should be covered with painter's tape.
Testing the Paint
Painted popcorn ceilings can be more challenging to remove than unpainted ones. The paint often creates a waterproof barrier that prevents water from effectively penetrating and softening the texture. Testing a small, inconspicuous area of the ceiling with water is recommended. Spray the area and let it sit for 10-15 minutes. If the texture softens readily, scraping should be relatively easy. If the water beads or doesn't seem to penetrate, scoring the ceiling's surface with a scraper may be necessary to allow water absorption.
Spraying the Ceiling
Using the spray bottle or garden pump sprayer, apply a light, even coat of water to a manageable section of the ceiling (approximately 4x4 feet). Avoid over-saturating, as this can damage the drywall underneath. Allow the water to soak in for 15-20 minutes, reapplying if necessary. The texture should soften and become pliable, indicating readiness for scraping.
Scraping the Popcorn Texture
Holding the scraper at a slight angle to the ceiling, apply even pressure and scrape the softened texture. Overly aggressive scraping can gouge the drywall, so a consistent, controlled approach is essential. For stubborn areas, reapply water and allow it to soak further. Periodically clean the scraper blade to maintain its effectiveness. A mud pan held beneath the scraper can help catch falling debris.
Cleaning Up
Once the entire ceiling has been scraped, carefully remove the drop cloths and plastic sheeting, ensuring debris is contained within. Dispose of the waste according to local regulations. Vacuum or sweep the floor thoroughly to remove any remaining dust or debris. The ceiling may require some minor repairs, such as patching small gouges or cracks, before priming and painting.
Addressing Imperfections and Preparing for Finishing
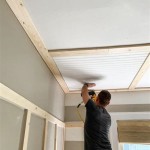
After the popcorn texture is removed, imperfections in the underlying drywall may become visible. These imperfections can include cracks, nail pops, or uneven surfaces. Filling these imperfections with drywall compound is necessary for a smooth, finished look. Apply the compound using a putty knife, feathering the edges to blend seamlessly with the surrounding surface. Allow the compound to dry completely and sand smooth before priming. Priming the ceiling seals the surface and provides a better base for paint adhesion.
Safety Precautions
Throughout the entire removal process, prioritizing safety is paramount. Always wear appropriate safety gear, including eye protection and a dust mask or respirator, especially if the presence of asbestos is uncertain. Use a stable ladder or scaffolding when working at heights, and ensure proper ventilation in the room. If any electrical work is necessary, consult a qualified electrician.

Removing Popcorn Ceiling That Has Been Painted

Remove Painted Popcorn Ceilings Scraping A Ceiling

Removing A Painted Popcorn Ceiling Pro Tool Reviews

The Joy Of Popcorn Ceiling Removal Centsational Style

Tips On Painting Ceilings And Popcorn Ceiling Removal Colorblast

How To Easily Remove Popcorn Ceilings Diy Start Finish Youtube

How To Remove Popcorn Ceiling And Not

Removing A Popcorn Ceiling Diy Or Hire Pro Yelp

Scraping Popcorn Ceilings That Were Painted

Removing A Painted Popcorn Ceiling Pro Tool Reviews