Repairing Cracks in Ceiling Drywall
Cracks in ceiling drywall can be an eyesore and a sign of underlying structural issues. While minor cracks can be easily patched, larger cracks may require more extensive repairs to prevent further damage. This article will guide you through the process of repairing cracks in ceiling drywall, providing step-by-step instructions and tips for achieving a seamless finish.
Assessing the Crack
Before attempting any repairs, it is crucial to assess the severity of the crack. Minor hairline cracks are often caused by settling or minor movement of the house and can be repaired with minimal effort. However, larger cracks, particularly those that are widening or accompanied by other signs of structural damage, may require professional attention. If the crack is more than 1/4 inch wide, runs along the entire length of the ceiling, or is accompanied by other signs of damage, it is advisable to consult a structural engineer or contractor to determine the underlying cause and the appropriate repair solution.
Preparing the Area
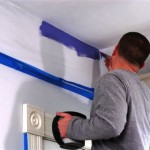
Once you have assessed the crack, you can begin preparing the area for repair. This involves cleaning the crack and surrounding area to remove any debris, dirt, or loose paint. Use a scraper or putty knife to remove loose drywall, and a damp cloth to wipe away any dust or grime. The goal is to create a clean and smooth surface for the patching compound to adhere to.
Filling and Patching the Crack
Now that the area is clean, you can begin filling and patching the crack. For minor cracks, a spackling compound is often sufficient. Apply the compound over the crack, ensuring it fills the entire gap and extends slightly beyond the edges. Use a putty knife to smooth the compound and create a smooth, even surface. Allow the compound to dry completely as per the manufacturer's instructions.
For larger cracks, a drywall patch may be necessary. Cut a piece of drywall to match the size and shape of the crack. Apply a thin layer of drywall compound to the back of the patch and press it firmly against the ceiling. Use screws or nails to secure the patch in place. Once the patch is secured, apply drywall compound over the seams and edges to create a smooth, continuous surface.
Sanding and Finishing
After the patching compound has dried, use sandpaper to smooth out any rough edges or uneven areas. Start with a coarse-grit sandpaper (80-100 grit) to remove excess compound and then switch to a finer-grit sandpaper (120-150 grit) for a smooth finish. Be careful not to sand too aggressively, as this can damage the surrounding drywall.
Once sanding is complete, prime the repaired area with a primer that matches the existing paint. This will help to create a uniform surface for the final paint layer. Allow the primer to dry completely before applying a fresh coat of paint to match the surrounding ceiling.
Additional Tips
Here are some additional tips for repairing cracks in ceiling drywall:
- Use a high-quality patching compound that is specifically designed for drywall repairs.
- Apply the compound in thin layers to prevent cracking or shrinkage.
- Allow the compound to dry completely between coats.
- Use a sanding block to create a smooth, consistent finish.
- Apply a light coat of paint over the repaired area, allowing it to dry completely before applying a second coat.
- If the crack is caused by structural movement, address the underlying issue to prevent further cracking.
Preventing Future Cracks
While repairs can help to conceal cracks, it is important to address the underlying cause to prevent future cracks from forming. Common causes include:
- **Settling or movement of the house:** This is a common issue in older homes and can be minimized by ensuring the foundation is stable and well-supported.
- **Improperly installed or damaged framing:** If the framing is not properly installed or damaged, it can put stress on the drywall and lead to cracks. This issue can be addressed by reinforcing the framing.
- **Excessive moisture:** Moisture can cause drywall to expand and contract, leading to cracking. Ensure proper ventilation in the affected areas and address any moisture issues promptly.
- **Improperly attached fixtures:** Heavy fixtures can put stress on the drywall and lead to cracks. Ensure fixtures are properly secured and distributed evenly.
By addressing these issues, you can help to minimize the risk of future cracks in your ceiling drywall.

How To Fix A Drywall Crack In Ceiling Or Wall For Ever Tutorial

How To Fix Cracked Drywall Ceiling

How To Repair A Cracked Drywall Ceiling Trick Foot Through Attic Easy Fix Part 1

How To Fix Ceiling Cracks 13 Steps With S Wikihow

How To Repair Cracks In A Drywall Ceiling 2025 Today S Homeowner

How To Repair A Cracked Drywall Ceiling

How To Repair A Cracked Drywall Ceiling This Old House Youtube

How To Repair Ceiling Drywall Cracks And Holes Hometalk

How To Fix Ceiling Cracks 13 Steps With S Wikihow

How To Fix Cracked Drywall Ceiling