Repairing a Hole in a Drywall Ceiling: A Comprehensive Guide
Drywall ceilings, ubiquitous in residential and commercial construction, offer a smooth, paintable surface. However, they are susceptible to damage from various sources, including water leaks, impacts, and everyday wear and tear. Addressing holes in drywall ceilings promptly is crucial to maintaining the structural integrity and aesthetic appeal of the space. This article provides a comprehensive guide to repairing a hole in a drywall ceiling, encompassing the necessary tools, materials, and step-by-step instructions.
Before initiating any repair, a thorough assessment of the damage is paramount. The size and nature of the hole, as well as the condition of the surrounding drywall, will dictate the appropriate repair method. Small holes, typically less than a few inches in diameter, can often be patched with relative ease. Larger holes, however, may necessitate more extensive repairs, including the installation of drywall patches or, in severe cases, the replacement of entire drywall sections.
Safety should always be the foremost consideration. Prior to commencing any work, it is essential to ensure the power to the affected area is turned off at the circuit breaker. This is particularly important if the hole is located near electrical wiring or fixtures. Additionally, wearing safety glasses and a dust mask is recommended to protect the eyes and respiratory system from drywall dust and debris. Finally, ensure adequate ventilation in the work area.
Key Point 1: Gathering the Necessary Tools and Materials
Successful drywall repair hinges on having the right tools and materials readily available. The following list encompasses the essential items required for patching a hole in a drywall ceiling:
*Utility Knife:
Used for scoring and cutting drywall. A sharp blade is essential for clean, precise cuts. *Drywall Saw:
Specifically designed for cutting drywall, offering maneuverability and control, particularly in tight spaces. *Joint Compound (Drywall Mud):
A paste-like material used to fill holes and seams in drywall. Different types of joint compound are available, including all-purpose, lightweight, and quick-setting. *Drywall Tape:
Used to reinforce seams between drywall pieces and to prevent cracking. Paper or fiberglass mesh tape are common options. *Drywall Patch:
A pre-cut piece of drywall, often with an adhesive backing, designed for patching small to medium-sized holes. *Sandpaper (Various Grits):
Used to smooth the patched area and blend it seamlessly with the surrounding drywall. A range of grits, from coarse to fine, is recommended. *Putty Knife or Taping Knife:
Used to apply and smooth joint compound. Different sizes are available, with wider knives suitable for larger areas. *Dust Mask:
Protects the respiratory system from drywall dust. *Safety Glasses:
Protects the eyes from dust and debris. *Drop Cloth or Plastic Sheeting:
Protects the floor and surrounding surfaces from dust and drips. *Ladder or Step Stool:
Provides safe access to the ceiling. *Stud Finder (Optional):
Useful for locating ceiling joists if additional support is needed. *Primer and Paint:
To match the existing ceiling finish for a seamless repair.Key Point 2: Step-by-Step Repair Process
The following steps outline the process of repairing a hole in a drywall ceiling. The specific techniques may vary depending on the size and nature of the hole, but the general principles remain the same:
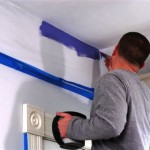
Step 1: Prepare the Area:
Remove any loose or damaged drywall around the hole. Use the utility knife to carefully score around the perimeter of the hole, creating a clean, even edge. If the hole is significantly damaged, it may be necessary to enlarge it slightly to create a stable surface for patching.Step 2: Create Backing (If Needed):
For larger holes (typically larger than 4 inches), it is essential to create a backing to support the drywall patch. This can be accomplished by attaching wood furring strips or a piece of plywood to the inside of the hole, using screws or construction adhesive. The backing should be slightly larger than the hole to provide adequate support.Step 3: Measure and Cut the Drywall Patch:
Measure the hole and cut a drywall patch to fit snugly. The patch should be slightly larger than the hole to allow for a slight overlap. Ensure the patch is cut cleanly and accurately.Step 4: Apply Joint Compound to the Patch:
If using a pre-made drywall patch with an adhesive backing, simply peel off the backing and press the patch firmly into place. For a standard drywall patch, apply a thin layer of joint compound to the edges of the patch and to the surrounding drywall. This will help to bond the patch to the ceiling.Step 5: Embed the Patch:
Carefully position the drywall patch over the hole and press it firmly into place. Ensure the patch is flush with the surrounding drywall. Use the putty knife or taping knife to smooth the joint compound around the edges of the patch, feathering it out to create a seamless transition.Step 6: Apply Drywall Tape (If Needed):
For larger patches or seams, applying drywall tape is recommended to reinforce the joint and prevent cracking. Apply a thin layer of joint compound over the seam and then embed the drywall tape into the compound. Use the putty knife to smooth the tape and remove any excess compound. Allow the first coat of joint compound to dry completely (usually 24 hours).Step 7: Apply Additional Coats of Joint Compound:
Apply two or three additional coats of joint compound, allowing each coat to dry completely before applying the next. With each coat, feather the edges of the compound further out to create a smooth, gradual transition. The goal is to create a seamless blend between the patch and the surrounding drywall.Step 8: Sand the Patch:
Once the final coat of joint compound is completely dry, sand the patched area smooth using sandpaper. Start with a medium-grit sandpaper (around 120-grit) and gradually move to a finer-grit sandpaper (around 220-grit). Be careful not to sand too aggressively, as this can damage the surrounding drywall. The objective is to create a smooth, even surface that is ready for priming and painting.Step 9: Prime and Paint:
Apply a coat of primer to the patched area to seal the drywall and create a uniform surface for painting. Allow the primer to dry completely before painting. Apply two coats of paint that matches the existing ceiling finish. Apply the paint evenly and allow each coat to dry completely before applying the next.Key Point 3: Addressing Common Challenges
While repairing a hole in a drywall ceiling is a relatively straightforward process, certain challenges may arise. Understanding these challenges and having strategies to address them can ensure a successful outcome.
Matching the Texture:
Matching the texture of the existing ceiling can be one of the most challenging aspects of drywall repair. Ceilings can have a variety of textures, including smooth, orange peel, knockdown, and popcorn. If the ceiling has a textured finish, it may be necessary to use a texture spray or other specialized tools to replicate the texture. Experiment on a scrap piece of drywall before applying texture to the patched area.Sagging Drywall:
If the drywall ceiling is sagging near the hole, it may indicate a structural problem. Address the underlying cause of the sagging before attempting to repair the hole. This may involve adding additional support to the ceiling joists or replacing damaged drywall sections.Water Damage:
Water leaks are a common cause of drywall damage. Before repairing the hole, identify and repair the source of the leak. Water-damaged drywall may need to be replaced entirely, as it can be weakened and prone to mold growth.Cracking:
Cracking can occur in drywall ceilings due to a variety of factors, including settling, temperature changes, and humidity fluctuations. To prevent cracking after repairing a hole, use drywall tape to reinforce the seams and ensure the joint compound is applied properly. Consider using flexible joint compound, which is more resistant to cracking.Dust Management:
Drywall repair generates a significant amount of dust. To minimize dust, use a shop vacuum to clean the work area frequently. Cover furniture and other surfaces with drop cloths or plastic sheeting. Consider using a wet sponge to wipe down the walls and ceilings to remove any remaining dust.By carefully following these steps and addressing any challenges that may arise, it is possible to successfully repair a hole in a drywall ceiling and restore the appearance of the space. Patience and attention to detail are key to achieving a professional-looking result and maintaining the structural integrity of the ceiling.

How To Repair A Hole In Your Ceiling Drywall

How To Repair A Hole In Your Ceiling Drywall

How To Repair A Hole In Your Ceiling Drywall

How To Repair Water Damage Walls Ceilings True Value

How To Patch A Textured Ceiling Fix Hole In The Diy

How To Patch Drywall 100 Things 2 Do

How To Repair A Hole In Your Ceiling Drywall

How To Patch A Hole In Textured Ceiling Ehow

How To Patch And Spackle Ceiling Holes Young House Love

How To Repair A Hole In Your Ceiling Drywall