Convert Can Light To Ceiling Fan
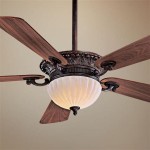
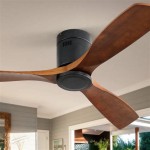
Replacing a can light with a ceiling fan can be a great way to improve the functionality and comfort of your room. Ceiling fans provide both light and air circulation, making them a great choice for any room in your home. Plus, they can be a great way to add style to your space.
If you're considering converting a can light to a ceiling fan, there are a few things you'll need to do to get started. First, you'll need to make sure that your ceiling can support the weight of a ceiling fan. Most ceiling fans weigh between 10 and 30 pounds, so you'll need to make sure that your ceiling can handle the additional weight.
Once you've confirmed that your ceiling can support a ceiling fan, you'll need to gather the necessary tools and materials. You'll need a screwdriver, a drill, a wire cutter, and a wire stripper. You'll also need to purchase a ceiling fan and a mounting bracket.
Once you have all of your tools and materials, you can begin the installation process. First, you'll need to remove the existing can light. To do this, simply use a screwdriver to remove the screws that are holding the can light in place. Once the screws are removed, you can carefully pull the can light out of the ceiling.
Once the can light is removed, you'll need to install the mounting bracket. The mounting bracket will come with instructions on how to install it, so be sure to follow those instructions carefully. Once the mounting bracket is installed, you can attach the ceiling fan to the mounting bracket.
Once the ceiling fan is attached to the mounting bracket, you'll need to wire the fan. To do this, simply connect the wires from the ceiling fan to the wires from the electrical box. Be sure to match the colors of the wires, and be sure to twist the wires together securely.
Once the fan is wired, you can turn on the power and test the fan. If the fan is working properly, you're all finished. You can now enjoy your new ceiling fan!
Here are a few tips for converting a can light to a ceiling fan:
- Make sure that your ceiling can support the weight of a ceiling fan.
- Gather the necessary tools and materials.
- Remove the existing can light.
- Install the mounting bracket.
- Attach the ceiling fan to the mounting bracket.
- Wire the fan.
- Turn on the power and test the fan.
Converting a can light to a ceiling fan is a relatively easy project that can be completed in a few hours. By following these steps, you can add style and functionality to your home.

6 In Recessed Light Conversion Kit White Can Converter R56

Convert Recessed Light To Ceiling Fan Thecanconverter

Model R56 5 6 Inch Can Conversion With Designer Flat Medallion

Hang A Ceiling Fan Or Light Fixture From Recessed Can With The Converter Youtube

4 Can Converter Recessed Light Kit 52893 Lamps Plus

Recessed Can Light Converter Kit Walmart Com

Recessed Light Conversion Kit Can Lights Lighting

Fantastic Ceiling Fan Lampshade Conversion Kit Shade Clips

The Can Converter 7 In Incandescent Remodel Or New Construction White Non Ic Open Recessed Light Kit Kits Department At Lowes Com

The Best Way To Convert A Can Light Pendant