How To Drywall A Basement Ceiling
Drywalling a basement ceiling is a significant undertaking that can greatly improve the aesthetics, insulation, and soundproofing of a basement. It's a project that, while requiring some skill and physical exertion, can be successfully completed by a homeowner with a moderate level of DIY experience. This article will provide a comprehensive guide on how to drywall a basement ceiling, covering everything from preparation to the final touches.
Before embarking on the project, it's crucial to assess the current condition of the basement ceiling and address any existing issues. This includes checking for leaks, mold, or structural problems. Repairing these issues before installing drywall is essential to prevent future problems and ensure the longevity of the finished ceiling. Furthermore, confirm that the basement meets local building codes regarding ceiling height and egress. Checking your local codes and ordinances may require a permit, depending on the scope of the project.
Proper planning is also critical. Accurately measuring the ceiling area will allow for calculating the amount of materials needed, minimizing waste and saving money. Consider the layout of the ceiling, including any obstructions such as pipes, ductwork, or electrical boxes. This will inform the cutting and installation process.
Preparing the Basement Ceiling for Drywall
The first step in preparing the basement ceiling involves ensuring the framing is adequate for supporting the weight of the drywall. Existing joists may be sufficient, but if they are spaced too far apart, additional furring strips may be required. Typically, joists should be spaced no more than 24 inches on center for ½-inch drywall. If using thinner ¼-inch drywall, closer spacing will be necessary. The furring strips, typically made of wood, should be attached perpendicular to the existing joists to provide a solid surface for screwing the drywall.
The attachment of furring strips to concrete or metal basement ceilings requires a different approach. In these cases, consider using metal furring channels, along with concrete fasteners or self-tapping screws, respectively. Proper anchoring is crucial to prevent the ceiling from sagging or falling. Ensure the fasteners are appropriately sized and spaced according to the manufacturer's recommendations.
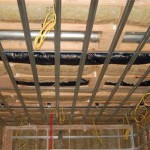
Before installing any drywall, it's essential to address any electrical wiring or plumbing that might be present in the ceiling cavity. Ensure all electrical work is performed by a qualified electrician and complies with local codes. Protect any plumbing with insulation to prevent condensation and potential leaks. Proper lighting is also key, so map out where your lighting fixtures will go before drywalling to ensure that all electrical wiring is accessible and properly placed.
Consider installing insulation before hanging the drywall to improve energy efficiency and soundproofing. Batt insulation can be easily fitted between the joists. Alternatively, spray foam insulation provides a more comprehensive seal but requires professional installation. Choosing the right type of insulation will depend on budget, climate, and desired level of performance.
The Drywall Installation Process
Drywall installation is best accomplished with two people, as the sheets can be heavy and unwieldy. However, if working alone, using a drywall lift is highly recommended. A drywall lift will hold the sheet in place while it's being fastened, making the process safer and more efficient. Begin by marking the location of the joists on the walls to make it easier to locate them when screwing in the drywall.
When lifting the first sheet of drywall, position it snugly against the wall and ceiling. Using drywall screws, secure the sheet to the joists, starting in the center and working outwards. Space the screws about 12 inches apart along the joists. Ensure the screws penetrate the joists sufficiently but do not puncture the paper facing of the drywall, as this can weaken the hold. A drywall screw gun with a depth setting is extremely helpful in preventing over-driving the screws.
Continue installing the drywall sheets, staggering the seams to create a stronger and more visually appealing ceiling. When cutting drywall to fit around obstructions such as pipes or ductwork, use a drywall knife and a T-square or measuring tape for accurate cuts. A drywall saw can be used for more intricate cuts. Always measure twice and cut once to minimize waste and ensure a precise fit.
When installing drywall around recessed lighting fixtures, use a hole saw to create the appropriate sized opening. Before cutting, ensure that the electrical wiring for the fixtures is disconnected and properly insulated. After the drywall is installed, reconnect the wiring and install the fixtures according to the manufacturer's instructions.
At seams where drywall sheets meet, leave a slight gap. This will allow for the application of joint compound and taping. Seams that are not properly taped and filled can lead to cracks and an uneven surface. Make sure the screw heads are slightly indented into the drywall board surfaces.
Taping and Finishing the Drywall Ceiling
Once the drywall is installed, the next step is to tape and finish the seams. This involves applying joint compound and paper or mesh tape to the seams and screw holes to create a smooth, seamless surface. Begin by applying a thin layer of joint compound over the seams, using a 4-inch or 6-inch drywall knife. Embed the paper or mesh tape into the compound, pressing firmly to remove any air bubbles. Let the compound dry completely, usually overnight.
After the first coat of compound has dried, apply a second coat, feathering the edges to blend the seam with the surrounding drywall. Use a wider drywall knife (8-inch or 10-inch) for this step. Again, allow the compound to dry completely. For a smooth, professional finish, a third coat of compound may be necessary. This coat should be applied with an even wider drywall knife (12-inch or larger) to create a seamless transition.
Once the final coat of compound has dried, sand the entire ceiling to remove any imperfections and create a smooth, even surface. Use a fine-grit sandpaper (120-grit or higher) and a sanding pole or drywall sander to reach the ceiling. Be careful not to over-sand, as this can damage the paper facing of the drywall. Wear a dust mask and eye protection to avoid inhaling drywall dust.
After sanding, prime the entire ceiling with a drywall primer. This will help the paint adhere to the drywall and create a uniform finish. Allow the primer to dry completely before painting. Choosing a high-quality paint specifically designed for ceilings will enhance the appearance and durability of the finished surface.
Inspect the finished ceiling carefully for any imperfections before painting. Small cracks, dents, or screw holes can be easily filled with joint compound and sanded smooth. Addressing these minor issues before painting will result in a more professional and polished final product.
Applying a textured finish to the drywall ceiling is an alternative to a smooth finish. This can help hide imperfections and add visual interest to the room. There are various types of textured finishes available, such as orange peel, splatter, and knockdown. The choice will depend on personal preference and the desired aesthetic. Textured finishes typically require specialized equipment and techniques, so it's important to practice on a small area before applying to the entire ceiling.
Proper ventilation is crucial throughout the drywalling process, especially during sanding and painting. Open windows and use fans to circulate air and remove dust and fumes. This will help protect your health and create a more comfortable working environment.
The finishing touches can greatly enhance the overall look of the newly drywalled basement ceiling. Installing crown molding or other decorative trim can add a touch of elegance and conceal any minor imperfections at the edges of the ceiling. Choose trim that complements the style of the room and install it carefully using a miter saw and finishing nails.
Installing recessed lighting is a great way to illuminate the basement and create a modern, stylish look. Choose fixtures that are energy-efficient and provide adequate light for the space. Proper placement of the fixtures is essential to achieve the desired lighting effect. Consider using a dimmer switch to control the intensity of the light and create a more ambient atmosphere.

How To Drywall A Basement Ceiling Toronto Painters

Is Drywall Ceiling In A Basement Any Good Remodeling Journey

Basement Ceilings Drywall Or A Drop Ceiling Fine Homebuilding

Basement Remodel Day 4 Hanging Taping Mudding Drywall

How Much Does It Cost To Drywall A Basement Real Estimate Services

Basement Drywall How To Properly A

Basement Ceilings Drywall Or A Drop Ceiling Fine Homebuilding

5 Faqs On Finishing A Basement Ceiling Sheffield Homes Finished Basements And More

Basement Drywall

Drop Ceiling Or Drywall Which One Should You Choose
See Also