How to Fix Cracks in Popcorn Ceilings
Popcorn ceilings, also known as acoustic ceilings, were a popular choice in residential construction for several decades due to their sound-dampening and aesthetic qualities. However, these ceilings are prone to cracking over time due to a variety of factors, including settling of the building, changes in humidity, or accidental impact. Repairing cracks in a popcorn ceiling requires a meticulous approach to ensure a seamless and visually appealing result. This article provides a comprehensive guide on how to effectively fix cracks in popcorn ceilings.
Before commencing any repair work, it is crucial to assess the composition of the existing popcorn ceiling. Many older popcorn ceilings contain asbestos, a hazardous material that requires professional abatement. If the house was built before the late 1970s, it is strongly recommended to have the ceiling tested for asbestos before attempting any repairs. Local environmental protection agencies can provide information on certified asbestos testing and removal services. Disturbing asbestos-containing materials can release harmful fibers into the air, posing a significant health risk.
Once the ceiling has been deemed asbestos-free or has been professionally abated, the repair process can begin. Gathering the necessary materials and tools is the first step. This includes a putty knife, joint compound, drywall tape (optional), a spray bottle filled with water, popcorn ceiling texture spray (available at most hardware stores), safety glasses, a dust mask, and drop cloths. The type of popcorn ceiling texture spray should match the existing texture as closely as possible to ensure a uniform appearance.
Adequate preparation of the work area is essential to protect surrounding surfaces from dust and debris. Drop cloths should be placed on the floor, and any furniture in the room should be covered. Wearing safety glasses and a dust mask is also recommended to prevent eye and respiratory irritation.
Preparing the Crack for Repair
The first step in the repair process involves preparing the crack for patching. This involves removing any loose or crumbling popcorn texture around the crack. Use a putty knife to gently scrape away any unstable material. Be careful not to enlarge the crack unnecessarily. The goal is to create a stable and clean surface for the patch to adhere to.
After removing any loose material, dampen the area around the crack with water from the spray bottle. This will help the joint compound adhere better to the existing ceiling. Avoid saturating the ceiling, as this can cause further damage. A light misting is sufficient.
For larger cracks (greater than 1/8 inch), it may be necessary to apply drywall tape. The drywall tape provides added strength and prevents the crack from reappearing. Cut a piece of drywall tape slightly longer than the crack. Apply a thin layer of joint compound over the crack, embedding the drywall tape into the compound. Use the putty knife to smooth the joint compound and remove any excess. Allow the joint compound to dry completely, typically overnight.
For hairline cracks, drywall tape may not be necessary. In these cases, apply a thin layer of joint compound directly to the crack, using the putty knife to smooth it out. Again, allow the joint compound to dry completely.
Applying the Popcorn Texture
After the joint compound has dried, it is time to apply the popcorn texture. This is the most crucial step in achieving a seamless repair. Before applying the texture, it is essential to test the popcorn ceiling texture spray on a piece of cardboard or scrap material. This will allow to practice the application technique and adjust the spray nozzle to achieve the desired texture.
Shake the can of popcorn ceiling texture spray vigorously for several minutes to ensure proper mixing. Hold the can approximately 12-18 inches from the ceiling and apply the texture in short, even bursts. Avoid holding the can in one place for too long, as this can result in an uneven texture and dripping.
The key to a successful repair is to match the existing texture as closely as possible. This may require multiple applications of the texture spray. Allow each layer to dry slightly before applying the next. Observe the surrounding ceiling to ensure that the new texture blends seamlessly with the old. It is better to apply several thin layers than one thick layer.
Pay close attention to the edges of the patched area. Feather the texture out slightly beyond the repair area to blend it with the surrounding ceiling. This will help to conceal the edges of the patch and create a more natural appearance.
Finishing the Repair
Once the popcorn texture has dried completely, inspect the repaired area carefully. If there are any areas that are too thick or too thin, they can be adjusted using a putty knife or a damp sponge. A putty knife can be used to gently scrape away any excess texture, while a damp sponge can be used to soften and blend the texture.
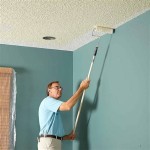
If the color of the patched area does not match the surrounding ceiling, it may be necessary to paint the entire ceiling. Use a paint that is specifically designed for popcorn ceilings. Apply the paint in thin, even coats, using a roller or a sprayer. Be sure to protect the surrounding walls and trim with painter's tape.
Allow the paint to dry completely before removing the drop cloths and cleaning up the work area. Dispose of any leftover materials properly. Vacuum the floor and any other surfaces that may have accumulated dust or debris.
Maintaining the repaired area is essential to prevent future cracking. Regularly inspect the ceiling for any signs of new cracks or damage. Promptly address any issues to prevent them from worsening. Avoid applying excessive pressure or weight to the ceiling, as this can cause it to crack. Control the humidity levels in the room to prevent moisture damage, which can also contribute to cracking.
For very extensive damage or for situations where asbestos is a concern, it is recommended to consult with a professional contractor. A professional can assess the extent of the damage and provide recommendations for the best course of action. They also have the expertise and equipment to safely remove asbestos-containing materials.
In some cases, it may be more cost-effective to remove the popcorn ceiling entirely and replace it with a smooth finish. This is a more involved process, but it can significantly improve the appearance of the room and eliminate the risk of future cracking. There are many resources available online and in home improvement stores that explain how to remove a popcorn ceiling. However, it is important to proceed with caution and follow all safety guidelines.
The successful repair of a popcorn ceiling crack is dependent on careful preparation, meticulous application, and a good match of the original texture. While seemingly daunting, following these steps helps homeowners manage and maintain the long term appearance and structural integrity of their ceilings.

How To Repair Broken Sheetrock On A Popcorn Ceiling Spencer Colgan

How To Fix A Ceiling Crack So It Will Not Come Back

Crack In Popcorn Ceiling Causes And Repair Options Waste Removal Usa

Can Cracks In Popcorn Ceiling Be Repaired

How To Fix A Cracked Popcorn Ceiling Tutorial Youtube

Zinnser Popcorn Repair Your Opinion Of Product Professional Painting Contractors Forum

What Is The Best Way To Repair Textured Ceilings Hometalk

Can Cracks In Popcorn Ceiling Be Repaired

How To Fix A Cracked Popcorn Ceiling Tutorial

How To Repair A Stucco Ceiling Crack And Re Attach Drywall Tape Youtube
See Also