How to Install a Ceiling Fan with Remote Control
Installing a ceiling fan with a remote control can enhance both the style and functionality of your home. Follow these comprehensive instructions to ensure a successful installation:
Materials You'll Need:
- Ceiling fan with remote control kit
- Screwdriver
- Drill
- Electrical outlet tester
- Ladder
- Wire strippers
- Electrical tape
Safety Precautions:
- Turn off the power to the ceiling fan circuit at the main electrical panel before starting.
- Wear gloves and safety glasses throughout the installation process.
- Use a sturdy ladder and ensure it is placed on a stable surface.
Step 1: Prepare the Electrical Box
Inspect the electrical box in the ceiling to ensure it is rated for the fan's weight. If not, you may need to install a reinforced box. If the box is suitable, proceed as follows:
- Turn off the circuit breaker for the existing light fixture.
- Remove the light fixture and disconnect the wires.
- Attach the mounting plate of the ceiling fan to the electrical box using the provided screws.
Step 2: Assemble the Ceiling Fan
Assemble the ceiling fan according to the manufacturer's instructions. This typically involves attaching the blades, motor housing, and other components.
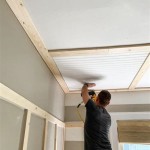
Step 3: Install the Ceiling Fan
Carefully lift the ceiling fan into place and align it with the mounting plate. Secure the fan to the plate using the provided bolts or screws.
Step 4: Connect the Wiring
Connect the wires from the ceiling fan to the wires in the electrical box. Typically, black wires connect to black, white wires connect to white, and green (or bare copper) wires connect to the ground wire.
- Strip the ends of the wires about 1/2 inch.
- Twist the exposed wires together and secure them with wire nuts.
- Wrap the connections in electrical tape for added insulation.
Step 5: Connect the Receiver
Install the receiver unit (typically attached to the ceiling fan's motor) and connect the wires according to the manufacturer's instructions.
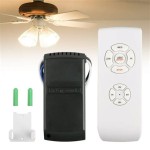
Step 6: Install the Remote Control
Follow the included instructions to install the remote control. This may involve pairing the remote to the receiver or installing batteries.
Step 7: Test the Ceiling Fan
Turn on the circuit breaker for the ceiling fan circuit.
- Use the remote control to turn on the fan and test all its functions.
- Check the rotation of the blades to ensure they are spinning in the correct direction.
Additional Tips:
- Use a level to ensure the fan is installed evenly.
- Consider using a canopy to hide the wiring and mounting plate.
- Regularly clean the ceiling fan to maintain its performance and appearance.

How To Wire A Ceiling Fan Control Using Dimmer Switch With Remote Wiring

I Am Installing A Remote To Ceiling Fan Where Does The Red Wire Go Quora

How To Wire A Ceiling Fan Control Using Dimmer Switch

How To Wire A Ceiling Fan With Remote Receiver Youtube

How To Wire A Ceiling Fan With Remote Receiver Youtube

Wiring For A Ceiling Fan With Dimmer Switch And Remote Doityourself Com Community Forums

Converting An Existing Ceiling Fan To A Remote Control

How To Wire A Ceiling Fan Temecula Handyman

Universal Ceiling Fan And Light Remote Control Kit Add A No In Wall Wiring Required Switch Speed Timming On Off Scene With Receiver Plate

Can I Control A Ceiling Fan W Remote Only Connected Things Smartthings Community