How To Install Faux Beams On Your Ceiling
Faux beams offer a compelling solution for homeowners looking to add character and visual interest to their living spaces without the significant cost and structural considerations associated with installing genuine wood beams. These lightweight and often more affordable alternatives can transform a plain ceiling into a stunning focal point, emulating the rustic charm of exposed timber or the sleek modern aesthetic of engineered wood. The installation process, while manageable for a DIY enthusiast, requires careful planning, precise measurements, and a methodical approach to ensure a secure and aesthetically pleasing result. This article provides a comprehensive guide to installing faux beams on a ceiling, covering essential preparations, installation techniques, and troubleshooting common issues.
Planning and Preparation: The Foundation of a Successful Installation
The initial phase of installing faux beams centers on meticulous planning and preparation. This stage is critical for ensuring a smooth and efficient installation process, minimizing errors, and achieving the desired aesthetic outcome. Key aspects of this preparatory phase include determining beam placement, selecting appropriate materials, gathering necessary tools, and accurately measuring and marking the ceiling.
Determining Beam Placement: Before any physical work begins, it is essential to visualize the desired final appearance. This involves considering the room's dimensions, existing architectural features, and the overall design style. Faux beams can be used to accentuate the length or width of a room, define specific areas within an open-concept space, or simply add visual interest to an otherwise plain ceiling. Consider the spacing between beams, their orientation (parallel, perpendicular, or intersecting), and their proximity to light fixtures, ceiling fans, or other existing elements. Sketching a rough layout on paper or using a digital design tool can be helpful in visualizing different beam configurations.
Selecting Appropriate Materials: Faux beams are available in a wide range of materials, each with its own advantages and disadvantages. Common materials include polyurethane, high-density foam, and hollow wood. Polyurethane beams are lightweight, durable, and resistant to moisture and insects. High-density foam beams offer a similar aesthetic but may be less durable. Hollow wood beams provide a more authentic wood appearance but can be heavier and more expensive. The choice of material should be based on aesthetic preferences, budget constraints, and the specific requirements of the installation environment. Additionally, consider the finish or texture of the beam. Many faux beams are available in a variety of pre-finished options, while others can be stained or painted to match existing decor.
Gathering Necessary Tools and Supplies: A well-equipped workspace is crucial for efficient faux beam installation. Essential tools and supplies include:
- Measuring tape and level: For accurate measurements and ensuring beams are installed straight.
- Stud finder: To locate ceiling joists for secure attachment.
- Pencil or marker: For marking measurements and guidelines on the ceiling.
- Drill and drill bits: For creating pilot holes and driving screws.
- Screws: Appropriate length and type for attaching beams to ceiling joists. Wood screws are typically recommended for wood joists.
- Construction adhesive: For added stability and to fill any gaps between the beam and the ceiling.
- Caulk gun: For applying construction adhesive neatly.
- Safety glasses and gloves: To protect eyes and hands during installation.
- Ladder or scaffolding: To safely access the ceiling.
- Saw (optional): To cut beams to the desired length if necessary. A miter saw is recommended for precise cuts.
- Wood filler or caulk: To fill any screw holes or gaps after installation.
- Paint or stain (optional): To touch up any imperfections or customize the beam's finish.
Measuring and Marking the Ceiling: Accurate measurements are paramount for a professional-looking installation. Use a measuring tape to determine the exact placement of each beam, taking into account any existing features or architectural constraints. Use a stud finder to locate the ceiling joists, which will provide the necessary support for the beams. Mark the location of each joist on the ceiling with a pencil or marker. These markings will serve as a guide for attaching the mounting blocks or furring strips, which will ultimately support the faux beams. Double-check all measurements before proceeding to the next step.
Installation Techniques: Securing the Faux Beams
The installation process involves attaching mounting blocks or furring strips to the ceiling joists, then securing the faux beams to these supports. The specific technique will vary slightly depending on the type of faux beam and the desired aesthetic. However, the fundamental principles remain the same: ensuring secure attachment, maintaining proper alignment, and concealing any visible fasteners.
Installing Mounting Blocks or Furring Strips: Mounting blocks or furring strips provide a solid foundation for attaching the faux beams to the ceiling. These are typically made of wood and should be sized appropriately to fit inside the faux beams. The number and spacing of the mounting blocks or furring strips will depend on the length and weight of the beams. As a general guideline, space them every 2-3 feet along the length of the beam. Attach the mounting blocks or furring strips to the ceiling joists using screws. Ensure that the screws are long enough to penetrate the joists securely. Use a level to ensure that the mounting blocks or furring strips are aligned horizontally.
Applying Construction Adhesive: Apply a bead of construction adhesive to the top of the mounting blocks or furring strips. This will provide added stability and help to fill any gaps between the beam and the ceiling. Use a caulk gun to apply the adhesive neatly and evenly. Avoid applying too much adhesive, as this can create a mess. Place the faux beam over the mounting blocks or furring strips, aligning it according to the previously marked guidelines. Press firmly to ensure that the beam is securely attached to the adhesive.
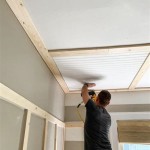
Securing the Beams with Screws: In addition to construction adhesive, screws are typically used to secure the faux beams to the mounting blocks or furring strips. Drill pilot holes through the beam and into the mounting blocks or furring strips. This will prevent the wood from splitting and make it easier to drive the screws. Use screws that are long enough to penetrate the mounting blocks or furring strips securely. Space the screws evenly along the length of the beam. Countersink the screws slightly below the surface of the beam. This will allow you to fill the screw holes with wood filler or caulk, concealing them from view.
Addressing Joint Seams: If the faux beams are not long enough to span the entire length of the ceiling, it may be necessary to join two or more beams together. This can be done using a variety of techniques, such as butt joints, miter joints, or scarf joints. A butt joint is the simplest type of joint, but it is also the least aesthetically pleasing. A miter joint involves cutting the ends of the beams at a 45-degree angle and then joining them together. A scarf joint is similar to a miter joint, but the angle is less steep, which provides a stronger joint. Regardless of the technique used, it is important to ensure that the joint is tight and seamless. Use construction adhesive to glue the two beams together. Clamp the joint until the adhesive has dried. Fill any gaps with wood filler or caulk. Sand the joint smooth and paint or stain to match the rest of the beam.
Troubleshooting and Finishing Touches
Even with careful planning and execution, minor imperfections or challenges may arise during the faux beam installation process. Addressing these issues promptly and effectively is crucial for achieving a professional-looking and durable result.
Addressing Gaps and Uneven Surfaces: Gaps between the faux beam and the ceiling, or uneven surfaces caused by variations in the ceiling or mounting blocks, can detract from the overall appearance. These imperfections can be remedied using a combination of techniques. For small gaps, apply a bead of paintable caulk along the edges of the beam. Smooth the caulk with a wet finger or a damp cloth. For larger gaps, consider using shims to fill the space before applying caulk. Uneven surfaces can be corrected by sanding down high spots or adding shims to low spots. After sanding, refinish the affected area to match the rest of the beam.
Concealing Fasteners: Exposed screw heads or nail holes can detract from the aesthetic appeal of the faux beams. To conceal these fasteners, use wood filler or caulk to fill the holes. Allow the filler or caulk to dry completely, then sand it smooth. Paint or stain the filled areas to match the rest of the beam. For a more decorative touch, consider using wooden plugs to cover the screw holes. Drill the holes slightly larger than the diameter of the plugs. Apply wood glue to the plugs and insert them into the holes. Tap the plugs lightly with a hammer to ensure they are flush with the surface of the beam. Sand the plugs smooth and paint or stain to match.
Adding Decorative Elements: To further enhance the appearance of the faux beams, consider adding decorative elements such as corbels, straps, or metal accents. Corbels are decorative brackets that can be attached to the underside of the beams. Straps are metal bands that can be wrapped around the beams to add a rustic or industrial touch. Metal accents can be used to highlight specific features of the beams, such as the joints or edges. When adding decorative elements, be sure to use appropriate fasteners and adhesives to ensure that they are securely attached to the beams.
Final Inspection and Cleanup: Once the installation is complete, conduct a thorough inspection to ensure that all beams are securely attached, that all fasteners are concealed, and that all surfaces are smooth and even. Clean up any debris or excess adhesive. Touch up any areas that may require additional attention. The installed faux beams should now provide a visually appealing and structurally sound addition to the ceiling.

Beam Installation Techniques Mounting Blocks Plank Barron Designs

Decorative Faux Wood Ceiling Beams How To Install Diy

Our New Faux Wood Beams Install

Diy Faux Ceiling Beams With Love Mercedes

Diy Faux Ceiling Beams With Love Mercedes

How To Diy A Faux Wooden Ceiling Beam Bower Power

Installing Faux Wood Beams On Your Ceiling Screwing The Beam In Chris Loves Julia

How To Build Beautiful Faux Ceiling Beams Diy Family Handyman

Easy Diy Faux Wood Ceiling Beams Step By Guide Pine And Prospect Home

Diy Faux Wood Beam Ceiling Jenna Sue Design