How To Install a Light Kit on a Ceiling Fan
Adding a light kit to a ceiling fan enhances both its functionality and aesthetic appeal. This guide provides a comprehensive, step-by-step approach to installing a light kit on a compatible ceiling fan.
Safety Precautions: Before beginning any electrical work, ensure safety by turning off the power to the circuit at the breaker box. Verify the power is off by flipping the wall switch that controls the fan. Using a non-contact voltage tester is recommended to double-check that the wiring is indeed de-energized.
Tools and Materials: Gather the necessary tools and materials before starting the installation. Typically, this includes the light kit itself (ensure compatibility with the fan model), screwdrivers (Phillips and flathead), wire strippers/cutters, wire nuts, and possibly electrical tape. The light kit's instructions may specify additional tools or materials.
Accessing the Fan's Wiring: Most ceiling fans designed for light kits have a pre-wired mounting point or housing located near the motor. This area is typically covered by a canopy or decorative plate. Carefully remove this covering to access the wiring. Consult the fan's manual for specific instructions regarding canopy removal, as the process can vary between models.
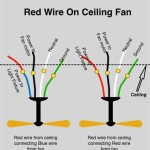
Identifying the Wires: Once the canopy is removed, locate the fan's wiring. Generally, there will be wires for the fan motor (often black and white) and separate wires for the light kit (typically blue, white, and black, or blue, white, and a different color hot wire). The fan's manual will provide a wiring diagram specific to the model, crucial for proper identification.
Connecting the Light Kit Wires: The next step is connecting the light kit's wiring to the fan's wiring. Connect the wires using wire nuts, matching the colors appropriately. The white wire from the light kit connects to the white wire from the fan (neutral). The black wire from the light kit connects to the blue wire from the fan (designated for the light kit). If the light kit has a black wire and the fan provides a different colored hot wire for the light, connect these two wires. Ensure all wire connections are secure and tightly capped with wire nuts.
Grounding the Light Kit: Proper grounding is essential for safety. The light kit and the fan's mounting bracket should have grounding wires (usually green or bare copper). These wires must be connected together with a wire nut. If the fan's mounting bracket doesn't have a grounding wire, secure the light kit's ground wire to the metal bracket using a grounding screw.
Securing the Light Kit: Once the wiring is complete, carefully secure the light kit to the fan's mounting bracket. Follow the specific instructions provided with the light kit, as mounting methods can vary. Ensure all screws and fasteners are tightened securely.
Installing Light Bulbs and Shades/Diffuser: After the light kit is securely mounted, install the light bulbs recommended in the kit's instructions. Do not exceed the maximum wattage specified. Once the bulbs are in place, install the shades or diffuser, following the manufacturer's guidelines.
Reassembling the Fan: Carefully replace the canopy or decorative cover that was removed earlier. Ensure it is properly aligned and secure it with the appropriate screws.
Restoring Power and Testing: Once the installation is complete, restore power to the circuit at the breaker box. Turn on the wall switch to test the fan and the light kit. The fan should operate normally, and the light should illuminate when the light switch is toggled.
Troubleshooting: If the light kit does not function correctly, double-check all wiring connections to ensure they are secure and correctly matched. Refer to the fan and light kit manuals for troubleshooting tips specific to the models. If the issue persists, consult a qualified electrician.
Important Considerations: Always refer to the manufacturer's instructions for both the ceiling fan and the light kit. These instructions contain critical safety information and model-specific guidance. If unsure about any step of the process, consulting a qualified electrician is highly recommended.
Choosing the Right Light Kit: Ensure compatibility between the ceiling fan and the light kit before purchase. Consider the style and finish of the light kit to complement the fan and the room's décor. Pay attention to the number and type of bulbs the kit uses and their energy efficiency.
Ceiling Fan Light Kit Installation How To
How To Install A Ceiling Fan Light Kit Shockley Electric
How To Install A Ceiling Fan Light Kit Youtube
How To Add A Light Kit Your Ceiling Fan Mr Electric
How To Replace A Ceiling Fan Light Kit Smafan Com
How To Install A Hampton Bay Ceiling Fan Light Kit Fans Lighting Patio F Kits With
Wiring A Ceiling Fan And Light With Diagrams Ptr
How To Install A Ceiling Fan Light Kit Youtube
How To Install A Ceiling Fan With Light Girl S Guide Home Diy
Wiring A Ceiling Fan And Light With Diagrams Ptr