How To Paint A Ceiling Like A Pro
Painting a ceiling can be a daunting task, but it's definitely doable with the right preparation and technique. Here's a step-by-step guide to help you paint a ceiling like a pro:
Gather Your Supplies
Before you start painting, you'll need to gather all of your supplies. Here's a list of everything you'll need:
- Paint
- Primer (if needed)
- Paint roller and tray
- Extension pole
- Brush
- Painter's tape
- Drop cloths
- Safety glasses
- Dust mask
Prepare The Ceiling
Once you have all of your supplies, it's time to prepare the ceiling for painting. This involves cleaning the ceiling, removing any dust or debris, and repairing any cracks or holes.
To clean the ceiling, use a damp cloth or sponge with a mild detergent. Be sure to rinse the ceiling well with clean water and allow it to dry completely before painting.
If there are any cracks or holes in the ceiling, you'll need to repair them before painting. To do this, use a spackling paste or caulk to fill in the cracks or holes. Allow the spackling paste or caulk to dry completely before painting.
Prime The Ceiling (If Needed)
If you're painting a ceiling that has never been painted before, or if the ceiling is in poor condition, you'll need to prime it before painting. Primer helps to create a barrier between the paint and the ceiling, which helps the paint to adhere better and last longer.
To prime the ceiling, use a brush or roller to apply a thin coat of primer to the entire surface. Allow the primer to dry completely before painting.
Apply The Paint
Once the ceiling is primed (if needed), it's time to apply the paint. To do this, use a paint roller and tray. Pour some paint into the tray and roll the roller in the paint until it is evenly coated.
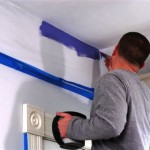
Start painting the ceiling in the corner of the room. Use long, even strokes to apply the paint to the ceiling. Be sure to overlap each stroke by about 50% to ensure even coverage.
Continue painting the ceiling until the entire surface is covered. Once you've finished painting the main part of the ceiling, use a brush to paint the edges and corners.
Allow The Paint To Dry
Once you've finished painting the ceiling, allow the paint to dry completely before using the room. The drying time will vary depending on the type of paint you used. Be sure to check the paint can for the manufacturer's recommended drying time.
Once the paint is dry, you can remove the painter's tape and drop cloths. Your ceiling is now painted and ready to enjoy!

How To Paint A Ceiling Like Pro Inspirations

How To Paint A Ceiling Diy Like Pro

Paint Like A Pro How To Ceiling

Tips On How To Paint Ceilings Like A Pro Capital Painter

How To Paint A Ceiling

How To Paint A Ceiling Like Professional Aboff S

How To Paint Ceilings Fast And Like A Professional Painter

Painting A Ceiling Like Pro Travis Perkins

How To Paint Your Ceiling Paintway

5 Ways To Paint Your Ceiling Like A Pro Island Paints