How To Patch Up A Hole In The Ceiling
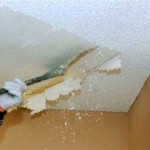
Discovering a hole in the ceiling can be a homeowner's nightmare. Whether caused by water damage, errant furniture, or simply age and wear, a hole detracts from the aesthetic appeal of a room and, if left unaddressed, can lead to further structural problems. Fortunately, patching a hole in the ceiling is a manageable DIY project, provided one has the right tools, materials, and a clear understanding of the process.
The complexity of the repair depends largely on the size and nature of the hole. Small holes, such as those left by nails or screws, are relatively easy to patch. Larger holes, however, require more extensive preparation and may necessitate the use of support structures to ensure a durable and seamless repair. The following guide outlines the steps involved in patching various sizes of holes in a ceiling, equipping individuals with the knowledge to tackle this common home repair task.
Assessing the Damage and Gathering Supplies
Before commencing any repair work, a thorough assessment of the damage is crucial. This involves identifying the size and cause of the hole, as well as examining the surrounding ceiling area for any signs of weakness or water damage. Addressing the root cause of the problem, such as a leaking roof or plumbing issue, is paramount to prevent the recurrence of similar damage in the future.
Once the damage has been accurately assessed, the necessary tools and materials can be gathered. These typically include: * A utility knife or drywall saw * A stud finder * A drill and screws * Drywall or patching compound * Drywall tape or mesh tape * A wide putty knife * Sandpaper or a sanding sponge * Primer * Ceiling paint * Safety glasses and a dust mask * A ladder or step stool
The choice of drywall or patching compound depends on the size of the hole. For smaller holes, patching compound is often sufficient. For larger holes, using a piece of drywall is generally recommended. It's beneficial to choose a drywall piece that is slightly larger than the hole itself to allow for proper overlap and secure attachment.
Safety is a paramount consideration throughout the project. Wearing safety glasses protects the eyes from dust and debris, while a dust mask prevents the inhalation of airborne particles. A sturdy ladder or step stool is essential for safely accessing the ceiling area.
Patching Small Holes (Nail Holes, Screw Holes)
Small holes, such as those left by nails or screws, can be patched with relative ease using patching compound. The process involves several steps:
1.
Preparation:
Begin by cleaning the area around the hole. Remove any loose debris, dust, or flaking paint. This creates a clean surface for the patching compound to adhere to effectively.2.
Applying Patching Compound:
Using a putty knife, apply a small amount of patching compound to the hole. Press the compound firmly into the hole to ensure it fills the space completely. Overfill the hole slightly, as the compound will shrink as it dries.3.
Smoothing:
Use the putty knife to smooth the patching compound flush with the surrounding ceiling surface. Feather the edges of the compound to blend seamlessly with the existing texture.4.
Drying:
Allow the patching compound to dry completely, following the manufacturer's instructions. Drying times vary depending on the type of compound used and the humidity level of the environment.5.
Sanding:
Once the compound is fully dry, use sandpaper or a sanding sponge to lightly sand the patched area. This removes any imperfections and creates a smooth, even surface.6.
Priming and Painting:
Apply a coat of primer to the patched area to seal the surface and promote adhesion of the paint. Allow the primer to dry completely before applying a coat of ceiling paint that matches the existing ceiling color. Apply additional coats of paint as needed to achieve complete coverage and a uniform finish.Patching Medium to Large Holes (Drywall Patches)
Patching larger holes requires a more elaborate approach, involving the use of a drywall patch. The following steps outline the procedure:
1.
Preparing the Hole:
Using a utility knife or drywall saw, carefully cut away any loose or damaged drywall around the hole to create a clean, rectangular or square opening. This ensures a stable surface for attaching the drywall patch. This involves cutting back to the nearest solid framing member if necessary.2.
Measuring and Cutting the Patch:
Measure the dimensions of the prepared hole. Cut a piece of drywall that is slightly larger than the hole, allowing for an overlap of approximately 1-2 inches on each side. Ensure the patch is precisely cut for a snug fit.3.
Installing Support (If Necessary):
For larger holes, installing support behind the drywall is crucial for added stability. This can be achieved by attaching wood furring strips to the existing ceiling framing using screws. The furring strips should extend beyond the edges of the hole to provide a solid backing for the drywall patch.4.
Applying Adhesive:
Apply construction adhesive to the back of the drywall patch around the edges or to the furring strips you've installed.5.
Inserting the Patch:
Carefully insert the drywall patch into the hole, ensuring it sits flush with the surrounding ceiling surface. Secure the patch to the furring strips or the existing drywall using drywall screws. Space the screws evenly along the perimeter of the patch, driving them in until they are slightly below the surface of the drywall.6.
Taping and Mudding:
Apply drywall tape or mesh tape over the seams between the patch and the existing ceiling. Press the tape firmly into place, ensuring it is smooth and wrinkle-free. Apply a layer of drywall compound (also known as "mud") over the tape, using a wide putty knife to spread it evenly. Feather the edges of the compound to blend seamlessly with the surrounding ceiling surface.7.
Multiple Coats of Mud:
Allow the first coat of drywall compound to dry completely. Apply a second coat of compound, again feathering the edges. Repeat this process as needed until the seams are completely concealed and the patched area is smooth and even with the surrounding ceiling. Each coat of mud should be thinner than the previous one.8.
Sanding:
Once the final coat of drywall compound is fully dry, use sandpaper or a sanding sponge to lightly sand the patched area. This removes any imperfections and creates a smooth, even surface. Be cautious not to sand too aggressively, as this can damage the drywall tape or expose the seams.9.
Priming and Painting:
Apply a coat of primer to the patched area to seal the surface and promote adhesion of the paint. Allow the primer to dry completely before applying a coat of ceiling paint that matches the existing ceiling color. Apply additional coats of paint as needed to achieve complete coverage and a uniform finish.Texturing the Patch
Ceilings often have a textured finish, such as popcorn texture or orange peel texture. It is important to match the texture of the patch to the existing ceiling for a seamless repair. Several methods can be used to achieve this:
1.
Popcorn Texture:
Popcorn texture can be applied using a spray can of popcorn ceiling texture or a hopper gun. Practice spraying the texture on a piece of cardboard to get a feel for the application process. Apply the texture in thin, even coats, allowing each coat to dry before applying the next. Avoid applying too much texture at once, as this can cause it to sag or drip.2.
Orange Peel Texture:
Orange peel texture can be applied using a drywall knife or a texture roller. Apply a thin layer of drywall compound to the patched area and then use the knife or roller to create the desired texture pattern. Practice on a piece of cardboard to get a feel for the technique.3.
Matching Existing Texture:
If attempting to match an existing texture, it may be necessary to experiment with different techniques and materials. Consult with a professional drywall contractor for advice if needed. In some cases, it may be easier to re-texture the entire ceiling to ensure a uniform finish.After applying the texture, allow it to dry completely before priming and painting the patched area. This ensures that the texture is properly sealed and protected. Using the same primer and paint as the existing ceiling will further enhance the seamlessness of the repair.

3 Ways To Fix Holes In A Ceiling Wikihow

How To Repair A Hole In Your Ceiling Drywall

How To Patch And Repair A Hole In The Ceiling Diy Great Home Ideas

How To Patch Small Holes In A Textured Ceiling

How To Patch And Spackle Ceiling Holes Young House Love

How To Fill Up A Horrid Hole In The Ceiling

3 Ways To Fix Holes In A Ceiling Wikihow

How To Fix A Hole In Ceiling Board

3 Ways To Fix Holes In A Ceiling Wikihow

How To Repair A Large Drywall Hole In Your Ceiling Thrift Diving