Install A Ceiling Fan Without Existing Wiring
Installing a ceiling fan without existing wiring may seem like a daunting task, but it is possible with some careful planning and preparation. Here's a step-by-step guide to help you through the process.
Step 1: Determine Your Power Source
Your first step is to determine where you will draw power for your ceiling fan. There are two main options:
- Electrical Outlet: If you have an electrical outlet on your ceiling, you can easily connect your fan to it using an adapter.
- Hardwire: If you don't have an electrical outlet on your ceiling, you will need to hardwire the fan to your electrical panel. This is a more complex option and requires some electrical knowledge.
Step 2: Gather Your Materials
Once you know your power source, you will need to gather the following materials:
- Ceiling fan
- Ceiling fan adapter (if necessary)
- Electrical wire (if hardwiring)
- Wire connectors
- Screwdriver
- Drill
- Mounting bracket
- Safety glasses
Step 3: Prepare the Electrical Wiring
If you are hardwiring your fan, you will need to prepare the electrical wiring as follows:
- Turn off the power to the circuit that you will be working on.
- Drill a hole through the ceiling near the desired location of your fan.
- Run the electrical wire through the hole and into the electrical panel.
- Connect the wires to the appropriate terminals in the electrical panel.
- Turn the power back on.
Step 4: Install the Mounting Bracket
Once the electrical wiring is prepared, you can install the mounting bracket as follows:
- Attach the mounting bracket to the ceiling joists using screws.
- Make sure the mounting bracket is level and secure.
Step 5: Hang the Ceiling Fan
With the mounting bracket installed, you can now hang the ceiling fan as follows:
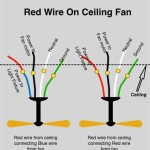
- Connect the fan's electrical wires to the electrical wires coming from the ceiling.
- Use wire connectors to secure the connections.
- Hook the fan onto the mounting bracket.
- Tighten the screws to secure the fan.
Step 6: Install the Fan Blades
Once the fan is hung, you can install the fan blades as follows:
- Slide the fan blades onto the fan hub.
- Secure the fan blades with screws.
- Make sure the fan blades are balanced before turning on the fan.
Step 7: Turn on the Power
Once the fan is completely installed, you can turn on the power and enjoy your new ceiling fan.

How To Install A Ceiling Fan Where No Fixture Exists 8 Step Guide Home Inspector Secrets

Installing A Ceiling Fan Without Existing Wiring Electricians Talklocal Blog Talk Local

How To Install A Ceiling Light Fixture Without Existing Wiring Lights Fixtures Diy Electrical

How To Install A Ceiling Fan In Location Without Existing Power Hunker Installation Wiring

Installing A Ceiling Fan Without Existing Wiring Mr Electric

How To Install A Ceiling Fan Without Having Cut Into The Electrical Box No Attic Access Quora

How To Install A Ceiling Fan Where No Fixture Exists 8 Step Guide Home Inspector Secrets

How To Install A Ceiling Fan Without Existing Wiring

How To Install A Ceiling Fan Without Existing Wiring 8 Steps

How To Install A Ceiling Fan Without Existing Wiring 8 Steps