Installing A Ceiling Electrical Box
Ceiling electrical boxes mount flush with the surface of the ceiling and are used to support lighting fixtures and other electrical devices. They come in a variety of shapes and sizes, and can be installed using a variety of different methods. This article will describe the most common method of installing a ceiling electrical box, which involves using a drywall saw to cut a hole in the ceiling and then mounting the box to the ceiling joists.
Safety First
Before you begin, it is important to take some safety precautions. First, make sure that the power to the circuit that you will be working on is turned off. You can do this by flipping the breaker or removing the fuse. Next, put on safety glasses and gloves to protect yourself from dust and debris. Finally, make sure that you have a sturdy ladder or step stool that you can use to reach the ceiling.
Tools and Materials
To install a ceiling electrical box, you will need the following tools and materials:
- Drywall saw
- Drill
- Screwdriver
- Ceiling electrical box
- Screws
- Wire nuts
- Electrical tape
Instructions
1. Locate the joists. The first step is to locate the joists in the ceiling. You can do this by using a stud finder or by simply tapping on the ceiling until you hear a solid sound. Once you have located the joists, mark their location on the ceiling with a pencil.
2. Cut the hole. Next, use a drywall saw to cut a hole in the ceiling. The hole should be slightly larger than the electrical box.
3. Mount the box. Once you have cut the hole, mount the electrical box to the ceiling joists using screws. Make sure that the box is secure and that it is level.
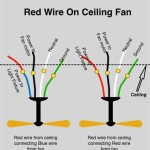
4. Connect the wires. Next, connect the wires to the electrical box. The black wire should be connected to the brass screw, the white wire should be connected to the silver screw, and the green wire should be connected to the green screw. Twist the wires together and secure them with wire nuts.
5. Insulate the wires. Once the wires are connected, insulate them with electrical tape. This will help to prevent electrical shocks and fires.
6. Install the fixture. Finally, install the lighting fixture or other electrical device to the electrical box. Make sure that the fixture is secure and that it is working properly.
Tips
Here are a few tips for installing a ceiling electrical box:
- If you are not sure how to connect the wires, consult a qualified electrician.
- Make sure that the electrical box is properly grounded.
- Use a level to make sure that the electrical box is level.
- Insulate the wires properly to prevent electrical shocks and fires.
- Install the lighting fixture or other electrical device securely.

How To Install Electrical Box For Ceiling Light Fixture

Repairing A Ceiling Electrical Box

Electric Box For Ceiling Fan Install Doityourself Com Community Forums

How To Install Ceiling Electrical Box New Construction
:strip_icc()/SCW_128_02-cefb4c77582c4dbaaba07e619aeacf8f.jpg?strip=all "How To Install A Ceiling Fan Electrical Box")
How To Install A Ceiling Fan Electrical Box

How To Install A Ceiling Fan Dummies

Junction Box Installation Kdm Fabrication

How To Install A Ceiling Light Fixture Diy Family Handyman

How To Install A Ceiling Light Fixture Diy Family Handyman
:strip_icc()/SCW_128_11-7e1617dc2e414228b5d03568d1c7c022.jpg?strip=all "How To Install A Ceiling Fan Electrical Box")
How To Install A Ceiling Fan Electrical Box