Replacing a Ceiling Fan with Recessed Lighting: A Comprehensive Guide
Many homeowners consider upgrading their existing ceiling fan fixtures with recessed lighting, often referred to as can lights or pot lights. This transition can significantly alter the ambiance and functionality of a room. Recessed lighting offers a clean, modern aesthetic and provides focused illumination, making it suitable for various applications such as highlighting specific areas or creating a general wash of light across the room. This article provides a detailed overview of the process involved in replacing a ceiling fan with recessed lighting, covering key considerations, planning, installation steps, and safety precautions.
Key Considerations Before Beginning the Replacement
Prior to beginning the replacement process, it is crucial to assess several factors. These considerations will impact the overall cost, complexity, and final outcome of the project. Ignoring these preliminary steps can lead to unexpected challenges and potentially compromise the success of the installation.
First, examine the existing electrical wiring. Determine the presence of any pre-existing wiring that can be utilized for the new recessed lights. Most ceiling fan installations are wired with a single circuit providing power to the fan and the integrated light fixture, if present. This existing circuit might be adequate for powering a limited number of recessed lights, but depending on the wattage of the planned lights and the existing circuit's ampacity, it may be necessary to run a new circuit from the electrical panel. Overloading a circuit can lead to tripped breakers and potential fire hazards.
Second, evaluate the joist layout within the ceiling. The spacing and orientation of the joists will dictate where recessed lights can be positioned. Joists run parallel to each other and provide structural support for the ceiling. Cutting into or modifying joists without proper reinforcement can compromise the structural integrity of the ceiling. It is important to identify the location of the joists using a stud finder or by accessing the attic space above the room. The spaces between the joists are ideal locations for installing the recessed light housings.
Third, consider the type and size of recessed light fixtures. Recessed lights are available in various sizes, typically ranging from 3-inch to 6-inch diameters. The size of the fixture often correlates with its wattage and light output. Smaller fixtures are generally used for accent lighting, while larger fixtures provide more general illumination. Different types of bulbs can be used, including incandescent, halogen, LED, and compact fluorescent (CFL). LED bulbs are generally preferred due to their energy efficiency, long lifespan, and minimal heat generation. The chosen fixture type must also be rated for the intended application, such as damp or wet locations if the installation is in a bathroom or kitchen.
Fourth, determine the number of recessed lights needed to achieve the desired level of illumination. This calculation depends on the size and shape of the room, the height of the ceiling, and the desired light level. A general rule of thumb is to space recessed lights approximately 2-4 feet apart, but this can vary depending on the specific needs of the space. Online lighting calculators and consultations with lighting professionals can help determine the optimal number and placement of fixtures.
Finally, assess the accessibility of the attic space above the ceiling. Access to the attic is often necessary for running new wiring and installing the recessed light housings. If the attic is not easily accessible or is cluttered with insulation or other obstructions, the installation process will be more challenging. Consider clearing a pathway through the attic to facilitate the installation and ensure safe working conditions.
Steps for Replacing a Ceiling Fan with Recessed Lighting
The following steps outline the process of replacing a ceiling fan with recessed lighting. Safety is paramount, and all electrical work should be performed with the power turned off at the circuit breaker. Consulting with a qualified electrician is highly recommended, especially for individuals unfamiliar with electrical wiring.
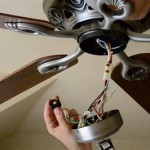
Step 1: Disconnect the Power and Remove the Ceiling Fan. Begin by turning off the circuit breaker that controls the ceiling fan. Verify that the power is off using a non-contact voltage tester. Carefully remove the ceiling fan fixture, following the manufacturer's instructions. Disconnect the electrical wiring from the fan, noting the wire colors (black for hot, white for neutral, and green or bare copper for ground). Cap off the exposed wires with wire connectors to prevent accidental contact.
Step 2: Determine Recessed Light Placement and Cut Holes. Based on the pre-determined layout, mark the locations for the recessed lights on the ceiling. Use a hole saw attachment on a drill to cut the holes for the recessed light housings. Ensure that the hole saw is the correct size for the chosen fixtures. Exercise caution when cutting the holes to avoid damaging any existing wiring or plumbing within the ceiling cavity.
Step 3: Run New Wiring (If Necessary). If the existing wiring is not sufficient for the new recessed lights, run a new electrical circuit from the electrical panel to the location of the lights. This involves connecting a new circuit breaker to the panel and running new wiring through the walls and ceiling to the first light fixture. The wiring should be secured to the joists using staples or cable ties. All wiring connections must be made within electrical junction boxes.
Step 4: Install Recessed Light Housings. Install the recessed light housings into the holes cut in the ceiling. The housings should be securely attached to the joists using screws or nails. Some housings are designed to be directly attached to the joists, while others require support brackets. Ensure that the housings are properly aligned and flush with the ceiling surface.
Step 5: Wire the Recessed Lights. Connect the electrical wiring to the recessed light housings. The wiring should be connected according to the manufacturer's instructions and local electrical codes. Typically, the black wire (hot) is connected to the black wire on the fixture, the white wire (neutral) is connected to the white wire on the fixture, and the green or bare copper wire (ground) is connected to the grounding screw on the fixture. Use wire connectors to secure the connections and ensure that they are properly insulated.
Step 6: Install the Light Bulbs and Trim. Install the light bulbs into the recessed light housings. Then, install the trim rings or bezels around the fixtures. The trim rings should fit snugly against the ceiling surface and cover the edges of the hole. Different types of trim are available, including baffle trims, reflector trims, and adjustable trims. Choose the trim that best suits the desired aesthetic and lighting effect.
Step 7: Test the Installation. After all the fixtures are installed and wired, turn on the circuit breaker to restore power to the lights. Test each light to ensure that it is functioning properly. If any lights do not work, double-check the wiring connections and ensure that the light bulbs are properly installed. If problems persist, consult with a qualified electrician.
Safety Precautions and Considerations
Safety is paramount when working with electricity. The following precautions should be observed throughout the installation process:
Always disconnect the power at the circuit breaker before working on any electrical wiring. Verify that the power is off using a non-contact voltage tester.
Wear appropriate safety gear, including safety glasses and gloves. This will protect your eyes and hands from electrical shock and physical injury.
Use insulated tools to prevent electrical shock. Avoid using metal tools that could conduct electricity.
Follow all local electrical codes and regulations. Ensure that the installation meets the requirements of the local building and electrical codes.
Consult with a qualified electrician if you are unsure about any aspect of the installation. A licensed electrician can provide expert guidance and ensure that the work is performed safely and correctly.
Proper insulation is essential when installing recessed lighting. IC-rated (Insulation Contact) fixtures are specifically designed to be in contact with insulation. Non-IC-rated fixtures require a minimum of three inches of clearance from insulation to prevent overheating and potential fire hazards. Baffled trims can also help reduce heat buildup.
Consider the placement of smoke detectors. Recessed lighting can affect the effectiveness of smoke detectors. Ensure that the lights are not positioned in a way that could obstruct the airflow to the smoke detector or interfere with its operation.
Replacing a ceiling fan with recessed lighting can significantly enhance the appearance and functionality of a room. By carefully planning the installation, following the steps outlined above, and adhering to safety precautions, homeowners can achieve a professional-looking result. However, it is crucial to recognize the inherent risks associated with electrical work and to consult with a qualified electrician if needed. A well-executed recessed lighting installation will provide years of reliable and aesthetically pleasing illumination.

Led Recessed Lighting Right Way

How To Install Led Recessed Lighting On High Ceiling A 200 Diy Project Youtube

How To Install Wire Or Connect Thin Led Recessed Lights 5000k Super Bright The Fan Youtube

Recessed Can Ceiling Fans Fixture Updates Lewiselectricalcontracting Com

Ready To Upgrade Your Lighting 8 Benefits Of Led Recessed Harrison Electric

4 Ways To Replace A Light Bulb In Ceiling Fan Wikihow

8 Recessed Lighting Installation Tips For Diyers Bob Vila

How Can I Install A Ceiling Fan Recessed Lights And Receptacles On The Same Circuit Home Improvement Lighting Track Fixtures

4 Ways To Replace A Light Bulb In Ceiling Fan Wikihow

Bedroom Recessed Lights Led Lighting Light Installation
See Also


