Replacing Ceiling Tiles With Drywall
Replacing outdated or damaged ceiling tiles with drywall offers a sleek, modern upgrade for any space. This process, while achievable for dedicated DIYers, requires careful planning and execution. This article outlines the necessary steps and considerations for a successful drywall ceiling installation.
Assessing the Existing Ceiling
Before beginning the project, a thorough assessment of the current ceiling is crucial. This evaluation informs material choices and installation strategies. The following points are essential:
- Tile Type: Identifying the type of ceiling tile (mineral fiber, acoustic, metal, etc.) helps determine the appropriate removal method and necessary safety precautions.
- Grid System: Examine the existing grid system for damage or instability. A compromised grid may need reinforcement or replacement before drywall installation.
- Wiring and Plumbing: Carefully locate any electrical wiring, plumbing pipes, or ductwork running above the tiles. These elements need to be accommodated during the drywall installation.
- Ceiling Height: Note the existing ceiling height. Adding drywall directly to the existing ceiling will lower the height slightly.
- Insulation: Assess the current insulation level. Replacing tiles with drywall presents an opportunity to improve thermal and acoustic performance.
Preparing the Work Area
Proper preparation ensures a smooth and efficient installation process. The following steps are recommended:
- Clear the Room: Remove furniture, rugs, and other items from the room to protect them from dust and debris. Cover remaining items with drop cloths.
- Safety Gear: Wear appropriate safety gear, including safety glasses, dust masks, and gloves, throughout the project.
- Electrical Precautions: Turn off the power to any light fixtures or electrical outlets in the ceiling before beginning work.
Removing the Ceiling Tiles
Careful removal of the existing ceiling tiles minimizes mess and potential damage to the grid system. The following points apply:
- Lift and Shift: Gently lift each tile and shift it diagonally to remove it from the grid.
- Grid Removal (Optional): If the grid system is in good condition and aligns with the desired drywall placement, it can remain in place to provide additional support. If the grid is to be removed, carefully disconnect it from the ceiling joists.
- Debris Disposal: Dispose of the old ceiling tiles appropriately. Some tiles may contain asbestos and require specialized handling.
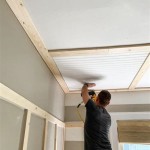
Installing the Drywall
Accurate measurements and proper handling are essential for a professional-looking drywall installation. The following steps outline the process:
- Measure and Cut: Measure the ceiling area precisely and cut the drywall sheets to fit. Allow for slight gaps between the drywall and walls for expansion.
- Lift and Secure: Use a drywall lift to raise the drywall sheets into position. Secure the drywall to the ceiling joists with drywall screws, ensuring they are countersunk but not overdriven.
- Staggered Joints: Stagger the drywall joints to prevent cracking and create a stronger ceiling.
- Edge Support: Ensure all edges of the drywall sheets are supported by ceiling joists or the existing grid system.
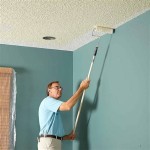
Finishing the Drywall
Proper finishing techniques create a seamless and professional appearance.
- Tape and Mud: Apply drywall tape to the joints and cover with several thin coats of joint compound (mud), allowing each coat to dry completely before applying the next.
- Sanding: Sand the dried joint compound smooth, creating a level surface for painting.
- Priming and Painting: Prime the entire ceiling with a drywall primer before applying the desired paint finish.
Considerations for Lighting and Fixtures
Addressing lighting and fixture placement before drywall installation streamlines the finishing process.
- Wiring Adjustments: Make any necessary adjustments to wiring for light fixtures before installing the drywall. Extend or reroute wiring as needed.
- Fixture Placement: Mark the locations of light fixtures, ceiling fans, and other fixtures on the drywall before installation.
- Cutouts: After the drywall is installed, carefully cut out the marked locations for the fixtures.
Insulation and Soundproofing
The removal of ceiling tiles provides an opportunity to upgrade insulation and soundproofing.
- Batt Insulation: Install batt insulation above the drywall for improved thermal performance.
- Sound-Dampening Materials: Consider adding sound-dampening materials, such as Green Glue or resilient channels, to reduce noise transmission between floors.

Drywalling Over A Tile Ceiling Youtube

Basement Small Drywall Tiles For Ceiling Home Improvement Stack Exchange

How To Replace Drop Ceiling Tiles

Ceiling Tile Installation Comparing Your Options Ceilings Armstrong Residential

A Drop Ceiling That Looks Better Than Drywall How To Install In Basement Diy

Walls

Updating An Old Ceiling Ceilings Armstrong Residential

The Dining Room Ceiling Oops Daniel Kanter

Is It Possible To Repair Our Sagging Ceiling Tiles And If So How Hometalk

Diy Coffered Ceilings With Moveable Panels Renovation Semi Pros