Wiring In Ceiling Fan With Light
Installing a ceiling fan with a light is a great way to add style and functionality to any room. While it may seem like a daunting task, it's actually quite simple with the right instructions. Here's a step-by-step guide on how to wire in a ceiling fan with light:
Step 1: Gather Your Materials
Before you begin, you'll need to gather the following materials:
- Ceiling fan with light
- Electrical wire (14-gauge or 12-gauge)
- Wire nuts
- Electrical tape
- Screwdriver
- Drill
- Safety glasses
Step 2: Turn Off the Power
This is the most important step! Before you do any electrical work, make sure to turn off the power to the circuit that you'll be working on. You can do this by flipping the breaker or removing the fuse.
Step 3: Mount the Ceiling Fan Bracket
The ceiling fan bracket is the metal plate that will support the fan. It needs to be mounted securely to the ceiling joists. To do this, drill pilot holes into the ceiling joists and then screw the bracket into place.
Step 4: Wire the Ceiling Fan
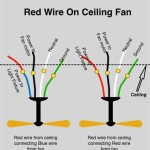
Now it's time to wire the ceiling fan. The fan will have three wires: a black wire, a white wire, and a green wire. The black wire is the hot wire, the white wire is the neutral wire, and the green wire is the ground wire.
Connect the black wire from the fan to the black wire from the ceiling. Connect the white wire from the fan to the white wire from the ceiling. Connect the green wire from the fan to the green wire from the ceiling.
Secure the wire connections with wire nuts and then wrap them with electrical tape.
Step 5: Install the Ceiling Fan
Once the fan is wired, you can install it on the ceiling fan bracket. To do this, lift the fan up and align the holes in the fan with the holes in the bracket. Insert the screws and tighten them until the fan is secure.
Step 6: Wire the Light
The light kit will have two wires: a black wire and a white wire. The black wire is the hot wire and the white wire is the neutral wire.
Connect the black wire from the light kit to the black wire from the fan. Connect the white wire from the light kit to the white wire from the fan.
Secure the wire connections with wire nuts and then wrap them with electrical tape.
Step 7: Install the Light
Once the light is wired, you can install it on the ceiling fan. To do this, lift the light up and align the holes in the light with the holes in the fan. Insert the screws and tighten them until the light is secure.
Step 8: Turn On the Power
Once the fan and light are installed, you can turn on the power. The fan and light should now be working properly.
Tips
- If you're not comfortable working with electricity, it's best to hire a qualified electrician.
- Make sure to follow all of the manufacturer's instructions carefully.
- Always wear safety glasses when working with electricity.
- If you have any questions, don't hesitate to ask a qualified electrician.

Wiring A Ceiling Fan And Light With Diagrams Ptr

Wiring A Ceiling Fan And Light With Diagrams Ptr

How To Wire A Ceiling Fan Temecula Handyman

Wiring Adding Recessed Lighting To Room With Ceiling Fan Light Already Installed Home Improvement Stack Exchange

How To Wire A Ceiling Fan For Separate Control Fo The And Light

Replacing A Ceiling Fan Light With Regular Fixture Jlc Online

Ceiling Fans Wiring And Installation Pocket Sparky

Ceiling Fan Wiring Diagram

Ceiling Fan Wiring Color Code

How To Wire A Ceiling Fan Control Using Dimmer Switch
See Also